Showing posts with label World War 2. Show all posts

Sunday, November 23, 2014

Paint Table - Sunday November 23, 2014

This short update will be it for the weekend's hobby progress, as I have a game to prepare for and play this evening. Who knew you could actually play games with these little guys...

I decided to keep my nicer Flag Dude flags for my Hundred Years War stuff, which uses them almost exclusively, and stick to plain paper flags printed off the internet for these figures. Here are the new German stands again with flags.
German knights with banners

Back in the late spring I also painted a bunch of WW2 US infantry and antitank guns with crews. I based these yesterday while doing the other miscellaneous things, so they are now complete. Finally. Some really fun games of Fireball Forward! was the spark to paint these (and I have American paratroops and German infantry ready to paint).
WW2 Americans in 15mm

Painting 15mm is certainly very different from painting the larger scales, but a simple process of undercoat, wash, drybrush and detail was pretty easy and came out well. Given that I almost never paint 15mm, I am very happy with these, and they are a terrific upgrade from the not-so-great purchased WW2 Americans I have been using.
WW2 American infantry close up

Now off to set up that game. And watch the Eagles play the Titans. And food shop. And cook dinner...

Tuesday, September 9, 2014

Daimler Ferret Scout Car

Having driven past this at least 100 times (on route 309 near Coopersburg), I'm glad I finally stopped and took some pictures. On the side of the road, not 10 feet from a major road, is an armored car of some sort. I've always wondered what it was, but have generally been in the middle of a long drive to or from work or family visits to north Jersey.
Daimler Ferret front/side

A link to a picture closely resembling this vehicle is here, where it is labeled a Daimler Ferret Mk 2/6 Scout Car. According to Wikipedia, there are a ton of minor variants of this vehicle, of which 4,409 were produced between 1952 and 1971. I have no idea what model this is. Nor does it matter...but there it is, and it looks cool.
Daimler Ferret rear

It took a decent bit of Googling to identify it. Given the general appearance, my first impression was that it was some sort of British WW2 light armored car. I was sort of close and sort of not. It is a lot more modern than I would have guessed, and so I spent time looking at WW2 armored cars of all nations to no avail. Eventually I stumbled on something that got me close, and then I found the picture linked above that got me to the right place.

I have no idea why it is sitting there rusting by the side of the road in Coopersburg, but at least I know what it is.

Sunday, June 29, 2014

Trio of antitank guns

There unfortunately isn't anything to report from a painting table perspective, since we spent the weekend in North Jersey at our in laws' new house. We had fun at the pool, just hanging out in general, and I managed to sneak away for an hour this morning to grab nine easy geocaches nearby. So it was a good weekend, if a washout from a hobby progress perspective.

On the way home this afternoon, we stopped at a local VFW (Veterans of Foreign Wars) post on route 206 not far from their house and took a few pictures. We have driven past this place at least a dozen times and I am not sure why I never bothered to stop. Today we did.

Now...I've seen lot of VFW posts over the years, and with them a great assortment of Korean War and Vietnam era U.S. tanks, cannons and howitzers. But I've never seen anything quite like this.

Tucked in conveniently next to the Wee Nee Wagon in front of the VFW post is a trio of German WW2 era antitank guns.
Pair of PaK38 50mm antitank guns

There are a pair of PaK38 50mm antitank guns. One is in pretty good condition, with the traverse and elevation controls and most if not all of the other mechanicals still present. The other is in worse condition, but still seems relatively complete. The tires are crumbling with age but seem original.
The better preserved PaK38 50mm with intact controls

Across the driveway is a PaK40 75mm gun. Standing next to it, this seems like a big gun, and while there certainly were larger bore and higher velocity pieces in the German arsenal, it is obvious to see why this was such a feared weapon. I could stick my arm down the muzzle.
Big brother - The PaK40 75mm antitank gun

The PaK40 seemed to be in rougher condition than the others, with controls missing, and a serious case of rust, but was still an impressive weapon nonetheless. I wouldn't want to be driving my tank down a country road and stumble on one of these hidden in the hedgerow...
PaK40 in rough condition

Regardless of condition, it was still pretty cool to see and touch these pieces of history.

Saturday, May 31, 2014

Painting Table Saturday - May 31 - US infantry

Having completed the large batch of American vehicles, the next couple of WW2 projects will be to continue assembling an assortment of German vehicles (mainly basic halftracks and halftrack variants) as well as painting a bunch of US troops. I have a Battlefront US late war infantry platoon (41 figs I think) and 8 anti tank gun crew figs prepped and ready to go.

I am curious to see how this will go. I am not used to painting 15mm figures. They seem awfully tiny when you are used to painting 25mm/28mm. I will need to learn as I go, finding a method and techniques that work for me. I am imagining some base wetbrushing/drybrushing followed by picking out detail, with some washing mixed in there somewhere. We'll see how it goes.
One tiny guy

End of Day update:
So far so good. Painting 15mm figs is definitely different, but I am not finding it difficult to make progress towards an acceptable figure. I'll post some details on how I ended up painting them when I am done, but I am proceeding roughly as I expected I would above. I do find that the only way I can paint these little guys is to take my glasses off because my aging eyes can't seem to focus on something this small as close as I need them to be. Without my glasses, I am blind as a bat...but can now focus on something 12-15 inches away just fine. Bifocals anyone? Sigh.
A bunch of tiny guys - end of Saturday

One test stand (a squad of three figures) is completely done and looks great. The remainder of the 50+ figures are well on the way to being done, and with a bit more time tomorrow I should be able to have these all substantially done. Uniforms have been painted. Most detail has been painted. What remains is to do the flesh areas and then whatever washing needs to be done, along with a little more final detail.

I am very pleased with how this is going (and the fact that I am able to crank out a good number of figures pretty quickly). I have taken a corner of the dining room table as a temporary paint station, and have been wandering in and out and painting in 10-20 minute increments when I can steal a few minutes throughout the day. That might not be the most ideal way to make progress, but I'll take a few moments when I can get them.

Tuesday, May 27, 2014

WW2 US Armored Force

One easy way to avoid the question of what dunkelgelb really looks like is to paint US forces instead. We were in and out of the house doing various things over the long holiday weekend, but in moments of down time I was able to make great progress on my small pile of "in process" and "not started yet" US tanks and other vehicles. You can never have too many Shermans, and none of my jeeps and trucks were finished yet...

All of the vehicles shown below had either been assembled and primed olive drab, or were still in their packaging as of Friday. Step 1 was to get everything primed and ready to go so I could paint them in assembly line fashion as much as possible. My intent was to do basic paint jobs, quickly, without lavishing too much attention on them; just get them done to a decent gaming quality.

All of the models are Battlefront Flames of War, and really are exceptional little pieces. Because they are such nice models, I ended up spending more time on them than I had anticipated, but they were well worth the extra effort. The models have a lot of character, with a number of different variants of molded-on stowage, and stowage bits that could be glued on to make each vehicle different. After I got all the basic painting done and began picking out the detail, I began to realize just how much detail there was on these tiny guys. [As an aside, all of these are either cast resin, or resin with some plastic components; none are the newer all-plastic models that they are coming out with now - I also assembled newer FoW kits this weekend with 5 German tanks and 4 German halftracks in all plastic, and they are amazing...]. In addition to the 10 tanks, 6 jeeps, and 8 trucks shown below, I also painted 5 anti-tank guns, but I will photograph them later (when they have crews). 29 vehicles and guns over a 4-day weekend is prodigious painting output for me.

A US armored task force with motorized infantry support and recon elements begins moving out from their rendezvous point in a Norman field:
Armored onslaught

Jeeps for recon and command elements.
Six Jeeps

Light trucks for towing anti-tank guns in towed tank destroyer units, or for miscellaneous transport duties.
Four Dodge 3/4 ton trucks

Heavy trucks for motorized infantry, or for supply hauling duties.
Four 2.5 ton trucks

Early model M4A1 cast hull Shermans with short barreled 75mm guns. These early model Shermans continued to see use until destroyed or rendered mechanically unfit for duty. Many pictures show these old workhorses in action in Germany right up until the end of the war.
Five M4A1 75mm Shermans

Later model M4A3 welded hull Shermans up-gunned with 76mm guns in larger turrets. Much better for facing enemy armor...
Five M4A3 76mm Shermans

The weekend's worth of painting. Lots more vehicle options for Fireball Forward! games now...
The assembled troops

I haven't finished the bases on the jeeps and trucks yet because I haven't decided exactly how I want to do them. Other than that, all these need is a clear coat to protect them.

Next...I'm not sure. Although I do have 5 assembled Panzer IV H's and 4 251/1 halftracks to deal with.

Saturday, May 24, 2014

Painting Late War German Panzer IV's

The following won't win any awards (unless you are a much much better painter than me), but is a simple straightforward way to get nice results on a non-airbrushed late war German 3 color camouflage scheme.

The basis of any (or most) German armor camo schemes is "dunkelgelb", or "dark yellow". This color has always apparently been a problem for military modelers, as the interpretation of what dunkelgelb means has been tremendously varied, with tones ranging from darker to lighter, more yellow to less so, brownish or not, a tint of green, or orangish, or apparently just about anything else even remotely in this color family. The issue for someone like me, who wants to base coat my models with a spray can, and doesn't have an airbrush (not a functioning one anyway), is that I need to buy something off the shelf that works. You'd think that within this hobby that such a thing would be easy. Well, it's not as easy as you'd think.

For this batch of models, which were primed a couple of days ago and painted today, I used the Plastic Soldier Company's dunkelgelb spray. When purchasing this at the local game store, I was concerned that it seemed way too green, but I have seen a lot of German armor done by Flames of War players at that store that had similar green-tinted base that looked nice, so I figured I'd give it a try.

Stage 1 - Base coating and foundation work:
  1. Prime the models with Plastic Soldier Company dunkelgelb spray. At this point, the models were way too apple/olive green for my taste, so I planned to address this in two ways - dry brushing before any further painting, and an extra dry brush of a light tan color at the very end to knock the colors down more.
  2. Using a large #16 artists shader brush, I dry brushed the models with Americana brand craft paint "celery green", a muted light green, and then a little very light dry brushing with Folk Art brand "camel", a light tan color. Picture #1 shows some models after this step. [although this particular picture may be after the celery but before the camel...]
  3. Citadel "mechanicus standard grey", a dark grey, was then painted on the tracks, the spare road wheel tires (but not all the road wheels), and the commander figures.
  4. A heavy black wash was then given to the tracks, the rear deck engine vents, the road wheels, drive sprockets and all other suspension components, the commander figure, and the gun muzzle. Picture #2 shows the vehicles at the end of this stage.

#1 - Primed and "foundation dry brushed"

#2 - Foundation work done

Stage 2 - Basic camouflage:
  1. For these models, I opted for a very basic squiggle pattern of short thin lines. The red-brown is Citadel's "doombull brown" and the dark green is Citadel's "castellan green". Both of these colors work very well. Picture #3 shows the models after this step. At this point the models look way too bright and clean, and the colors too stark. This is taken care of in the next step.
  2. Dry brush lightly but thoroughly with Folk Art "camel". This serves to knock the colors down and dull everything up quite nicely. It also takes the green down some and adds some tan back into the mix.

#3 - After camo but before dry brushing

Stage 3 - Detail work:
  1. Flesh - base color of flesh is painted and then washed with a flesh wash. At this scale, that's all the detail these little guys get. I used an unbranded basic flesh color and whatever Citadel is calling their flesh wash these days. [I still need to go back and pick out a little detail on the commanders after I do a little research to remind myself of what that little bit of detail should be]
  2. Tools and other bits on the tanks are painted brown for wood handles, gun metal metallic for shovel blades, etc.
  3. Tracks, which are a very dark grey at this point (having been heavily washed with black in stage 1), are highlighted by dry brushing the road contact surfaces with a gun metal silver color.
  4. The edges of the tracks (the parts susceptible to rust) are dry brushed with a rusty reddish brown. I used an older Citadel color called "terracottta".
  5. A judicious amount of mud splatter is painted around the road wheels and other suspension parts. If nothing else, this serves to disguise the fact that I only black washed the wheels, and didn't take the time to actually paint all the tiny little rubber road wheel edges black...

The acceptable finished product

I'm not sure I'm 100% thrilled with the end result, but this is the process I used to do three perfectly acceptable Mark IV's in a fairly short period of time today.

The one thing I think I will try next time, way back in step 2 of stage 1 (the foundation dry brushing), is to use a color that is even less green and more yellowy-tan. I am OK with today's result, but not so thrilled that I don't want to continue to tinker with my dunkelgelb just a little. That being said, I have seen a LOT of WW2 German armor painted in this light greenish base, and it does look good.

Product note - These three Panzer IV H's are all-metal Command Decision models from Old Glory (as is the incomplete King Tiger that snuck into one of the pictures). They are decent casts, considering their age, but are nothing like the box of five Flames of War all-plastic Panzer IV H's that I assembled this afternoon. But more on that soon.

Painting Table Saturday - May 24 - Panzers in Normandy

Following up on the great game of Fireball Forward! we had here last weekend, I have had a very strong urge to paint up some WW2 stuff. This is rare, as I really don't enjoy painting 15mm figs very much, and since I don't do it very often, I am not very good at it. The difference in scale makes for a very different kind of painting than the 25mm/28mm figs I am used to, at least in my mind.

Tanks and vehicles, on the other hand, are fun to paint, and can be cranked out to a pretty good level of quality in a reasonable amount of time. Given that these little guys are about an inch and a half long, I am going for a nice level of gaming quality as opposed to teeny works of art. These are generally viewed, en masse, from several feet away, after all.

I will post more on exactly how I did these, but for now I want to get back to the painting table...

The goal of today's hobby time is to turn more of these:
Selections from the lead mountain


Into more of these:
Panzer IV's prowl a Norman road

The Fireball Forward! scenario book on St Lo has been an inspiration, and I need lots more armor and other vehicles of all types.

Saturday, May 17, 2014

Painting Table Saturday - May 17 - WW2 odds and ends

OK, boring-est Painting Table update ever... After the terrifically fun Fireball Forward! game we had Friday night, I spent a few hours this weekend digging out and cataloging what I have for 15mm WW2 miniatures.

The answer is...more than I would have guessed, but not much of it properly based or even finished. More so than any other period I seem to have started lots of different sets of figures and vehicles without ever actually having finished much other than figures I have purchased already completed.

So the hobby time this weekend was spent getting everything in one place and assessing, followed by some thinking to come up with a plan of how to tackle some of this backlog. The short answer is to make sure I have modest size German and American forces complete and based for Fireball Forward!. I made good progress toward this today by breaking down some older bases and using the figures on FF! bases. Some very basic work is complete with only the finishing work remaining.

The second priority was to take some of the packs of Battlefront Flames of War figures and prep them for painting. I prepped and primed German infantry, American infantry and American paratroop sets. The next step will be to do some actual painting...

On the short list to complete are:

  • The above mentioned German and American infantry.
  • A handful of American and German antitank guns which have been primed and/or base coated but not finished.
  • Final detail work on 10 Sherman tanks and about 12 American trucks and jeeps that have been partially painted but need detail work to finish them.
That will be a start.

Fireball Forward! - Ukraine 1941

Relatively spur of the moment, Leo and Ryan and I were able to get together for a game of Fireball Forward! last night. Ryan has been dying to play WW2, I loved FF! when Leo and I played it a couple of times last summer, and it had just been generally way too long since we had an actual game of any sort.

Leo had a scenario that he had created, which was adapted from one of the Skirmish books, and he would umpire while Ryan and I played. The scenario was a Russian counterattack against a German defense at a small village and stream crossing. Playing with an umpire is great because everything starts off the table out of sight and is only revealed when spotted (generally when it shoots). The Germans had a couple of infantry platoons, some company weapons assets, a 75mm infantry gun and a pair of 37mm AT guns. I (the Russians) had 4 infantry platoons (in two companies, each with a few company assets), a Kommissar (who proved to be a worthless fraud), and 7 tanks in 3 groups; a T28 (?) in a group by itself, and two groups of 3 BT7's each.

The battlefield ( a nice compact 3' by 4', which is typical for FF games - lots of great action in a small space...), looking at the first picture from the Russian edge, had a cluster of buildings on either side of a stream in the distance. A road went up the middle, with a plowed beet field on the left and a swampy area on the right. The wheat colored rectangle at middle left is a field of high crops which would prove to be the hinge point of the game.

Turn 1 - Russians can opt to bring their infantry on in trucks, which I chose not to do. That would mean an open ground ride right up the middle, and I envisioned a lot of burning trucks and dead guys. I elected for a broad front advance, mostly avoiding the swampy area on my right flank. I should have been more aggressive with my one good tank, which cautiously inched onto the board (and ended up bringing up the rear of my turn 1 advance). The crappy little BT7's advance bravely. And died bravely. The first one got lit up by a flank shot from a 37mm ATG in the swamp. The second one went to face the ATG and died soon after. The second came on and fared little better, with one getting knocked out and another immediately panicking and fleeing the field. I needed to occupy buildings to win, which tanks cannot do, but I had hoped that they would be a little more...less dead less quickly.
Mostly through Turn 1

Turn 2 - As can be seen in the mid-turn picture below, the Russian infantry are advancing through the beet field (bottom of pic) while all the BT7's are either dead of have fled (4 dead, 2 panicked and gone). German infantry (machine guns) have exposed themselves by shooting out of the wheat field, tying up my infantry in the center. 5 out of my 6 infantry units are either on the road or left of it. The one remaining infantry platoon near the swamp will try to take out the 37mm ATG.
During Turn 2

Turn 3 - The last Russian tank (the good one) dies, my armored force having done nothing of consequence, other than to hold the attention of the 3 German guns. The Russian platoon in the swamp got into melee with the ATG and a supporting German infantry platoon, and that series of combats lasted the rest of the game, with the heroic gun crew beating back wave after wave of Russians. As it turns out though, the German infantry would have been better served moving to support the buildings in the center once the tanks were gone. The ATGs had served their purpose and could be left to die.
During Turn 3

Turns 3 and 4 saw a concerted effort by Russian infantry to advance in force through the wheat field, around its flank, and up the road if possible. I was able to run the gauntlet with one squad into the center building near the road, and worked my way around the one behind the flank of the wheat field. I was taking some casualties, but was also inflicting some and slowly clearing out the wheat field itself and chipping away at their supporting units.
During Turn 4

Turn 4 - The Germans were thinned out enough that I was able to use numbers to tie up the remaining Germans while a squad ran across the stream and into the building on the other side (2 victory points). At that point, I had the 4 victory points I would need to win the game after 5 turns (2 VPs for a building on the far side of the stream, and 1 each for two buildings on the near side). A last ditch German counterattack near the end of turn 4 to try to oust me from a building failed, and it was agreed that there was no way the few remaining Germans near the buildings I occupied would be able to push me out.
After Turn 4 (game effectively over)

It was a great game, and a good learning exercise for Ryan and I. We both made some mistakes, and both did some good things. We have a lot to learn about the rules, but that's the fun part. Our dice rolling seemed very particular on both sides. Ryan didn't shoot very well, except when shooting at tanks (which was great), and his morale rolls seemed good when testing under fire, but atrocious when trying to get his troops to enter a melee. On the other side, my firing was pretty good, my morale to enter combats was good, my rallying was OK, but I couldn't pass a morale check when fired on to save my life. It seemed like any time Ryan succeeded in hitting me with a shot, I broke. When in melees themselves, no matter how advantageous the combat for me, I would roll whatever I needed to remain locked in melee until the next turn. Among other things, it is these dice rolling patterns that develop during a game that makes games fun (what?! again?! really?!).

A few observations:

  • I love this game system and can't wait to play more. It is fantastic with a referee.
  • This is the first time we had a game of this with vehicles, and it showed. Ryan on the other hand had never played the system at all but did fine.
  • Russians are frustrating in their rigidity. Units activate by random card draws. Unlike the Germans (and the Americans when we played them) who get to choose which unit to activate when one of their cards comes up, the Russians have to splay the specific unit noted on the card. Getting things to occur in the sequence you would hope they would is almost impossible. But the Russians had notorious command issues early on in the war especially, so this felt right.

While the excitement of last night's game is fresh in my mind, I suspect that Paint Table Saturday today will revolve around taking stock of my modest WW2 collection, identifying needs, maybe a little painting and almost certainly some basing of existing infantry, which I am partway through. And maybe a side trip to a shop nearby that stocks the Flames of War miniatures range to pick up a few things...

Saturday, December 28, 2013

Painting Table Saturday - Dec 28 - Buildings

I saw an entry on a blog that I started following recently (here) that seemed interesting, so I decided to join in. The idea is "painting table Saturday", and the thought, done periodically it seems, is to have as many hobby bloggers as possible post what is sitting on their painting table in progress at the moment.
W.I.P. #1 - An abnormally clean workspace...

I just put my painting table back together following the recent departure of holiday house guests with little ones who require that my painting table gets stashed away during their visits, so it is much less cluttered with random bits than usual. All that is on it at the moment is the current project that I have been working on in tiny sessions at the kitchen table with a bottle of paint or two during holiday down time. The project is a trio of ruined buildings (Old Glory, 15mm scale) for use in WW2 games. These are very nice and inexpensive pieces that paint up very easily. They are basically just an exercise in layered dry brushing with a minimum of detail work. There is no intention that these be slaved over like works of art, but a competently done job will make them look terrific on the table.
WIP #2 - The Project

Sunday 12/29 addendum - After taking the above pictures early in the day, I had some extra time in and around a pair of family visits to my Mom's and my Brother Dave's to complete the three buildings. I am very happy with how they turned out, and will mix in very well with the WW2 buildings I already have.
Complete #1

All that is left to do, other than one last inspection to make sure I didn't miss finishing any spots, is to give them a few good coats of matte varnish for protection.
Complete #2

Lastly, one thing that I seem to apologize for a lot in my posts over the years is for the poorly lit pictures and subsequent bad picture quality. Following the arrival of a new Christmas toy set (more on this separately), I don't think I should have to apologize as much anymore. The above two pictures of the finished buildings were taken on the corner of my table with the setup shown below: a photography lighting kit with stands, reflector umbrellas and daylight bulbs.
New lighting toys

It should be fun playing around with these, and will help make my camera act more like the really good camera that it is...

Friday, December 20, 2013

Book Review - The Tank Killers

Earlier today I finished yet another history book that I have been working my way through over the past few weeks (ok... months): Harry Yeide's The Tank Killers; A History of America's World War II Tank Destroyer Force (Casemate, 2004).

Sideways again.... sigh...
I think I first cracked this book open sometime shortly after the Fireball Forward! miniatures games with Leo earlier this year, and a subsequent trip to Baldwin's Book Barn in West Chester that turned up a number of good deals on WW2 books.

I enjoyed this book very much. The opening section details the formative years of tank destroyer doctrine in the US Army and the training phases prior to actual combat experience. The bulk of the book works its way chronologically through the various campaigns in Africa and the European Theater of Operations. In addition to being a wargamer's treasure trove of small unit action scenario ideas, the descriptions of the combat experiences at a micro level are woven into a story of the evolution of tank destroyer doctrine at the macro level, and how the role of tank destroyers as envisioned differed so dramatically from the actual role that the TD units ended up playing.

There were also a number of things that I learned from this book in the area of equipment used and dates of service. I had always been under the impression that the self-propelled TDs in service for the bulk of the war in Europe were M10 "Wolverines" with their 3 inch (76mm) guns. This is somewhat true, but this book shows that M18 "Hellcats" (very fast, lightly armored TDs with 76mm guns) and M36 "Jacksons" (basically M10s but with 90mm guns) were in widespread use much earlier than I had thought. The first M18s were delivered in Italy in April 1944 and the M36s began replacing M10s in northwestern Europe in September 1944. By the Battle of the Bulge and subsequent operations, a mix of M10s, M18s and M36s would have been commonplace. This greatly expands the possibilities for the miniatures gamer...

There are two other Harry Yeide books that I picked up at Baldwin's at the same time as this, and I am especially glad that I did. These are Steel Victory; The Heroic Story of America's Independent Tank Battalions in the War in Europe (Presidio Press, 2003) and The Infantry's Armor; The US Army's Separate Tank Battalions in World War II (Stackpole, 2010). If they are similar at all to The Tank Killers, I will like them very much. Steel Victory is already on the night stand.

Saturday, August 10, 2013

Fireball Forward! - Pouppeville

Having had so much fun with Fireball Forward! last weekend, Leo and I wanted to get together again as soon as we could to have another go at it. We were able to find a couple hours last night to play the second scenario in the programmed instruction sequence, Pouppeville.

The scenario has two full sized but poor quality German platoons along with a company leader and a sniper defending a bunch of buildings (10 total elements/stands). US paratroops consisting of two heavy platoons and some battalion HQ assets are the attackers (9 total elements), and need to accumulate victory points for buildings captured. Most buildings are worth 1 VP at game end, but two buildings centered near the northern edge of the board are worth 5 and 2, and are thus very important. The game is four turns long, but the American random force addition die roll gave them an extra turn, thus a five turn game in this playing. My random roll got me a company leader morale improvement (which would matter later).

We flipped a coin for sides, and I got the Germans. I set up scattered in the buildings primarily in the center and east of the board, with only a sniper on the western side. I hoped that a central setup would allow me to respond to attacks from whatever direction Leo chose, or to fall back on the big VP buildings as needed. In the interests of trying to capture some fog of war without having a referee, we did use hidden unit markers including a number of dummies on each side. In a friendly game, this worked fine.

As it turned out, Leo advanced entirely up the eastern side of the road, both toward the first building along the road and then far to the east up and into the orchard. Not having placed any squads far to the west worked out well for me, but my sniper was badly out of position to do anything useful.
US early advance and hidden Germans - looking E/SE

Fire on both sides in the first turn was desultory, slowing his advance in a few places but not doing much in the way of casualties.
US advance on the east - looking South

In the middle few turns, German fire improved, killing an American squad in the orchard and another in the open. My sniper was killed trying to move to his other prepared position in the center of the board. A successful American assault on the first building along the east side of the road cost me a squad.
Fighting for the buildings - looking Northeast

As losses mounted for the Americans, it became obvious that the only way the Americans were going to win would be a successful assault on the high VP buildings in the last two turns. As it worked out, the paratroops were not able to take the next building up the road, which would have put them diagonally across the street from the 5 VP building. Further east, after killing a German squad in the building protecting the hedgerow enclosure in the northeast corner of the board, a final American squad and its platoon leader made an end run for the north edge of the board in hopes of taking the 2 VP building.
Final US push - looking Southeast

The American squad was gunned down crossing the open ground to assault the building, leaving the leader alone behind the hedgerow. The buildings were safe and Germans won the game. Final American losses were 3 out of their 4 heavy squads. Germans losses were two squads and the sniper.

All told, things went well for me. My fire early on wasn't great, but my morale rolls were better than Leo's in general, causing him to lose some of his good squads while my bad ones hung around bravely. In one case, the only reason I passed an important morale check in the mid-game, saving an important building and delaying Leo's advance, was that the company commander had rolled that improved morale random option. Another fun game of Fireball Forward!, and I already have the next two scenarios set up on the table: Tank Attack at La Fiere and Choctaw Warrior. Now I just need to learn the vehicle rules.

Sunday, August 4, 2013

Fireball Forward! - Brecourt Manor

After a long period of inactivity, and to christen the newly revamped gaming area with an actual game, Leo came over last night to push some figs around and teach me Fireball Forward!. It was just the two of us, but having seen some games of FbF at conventions recently and liking the look of it, I was anxious to try it out. Leo has played it a number of times and has recommended it highly. So the purpose of the evening was to just work through the rules for my benefit.

"Day of Days" - Brecourt Manor
FbF has its roots in the old Avalon Hill Squad Leader board game from days of yore. Being one of the earliest games I remember playing (and loving), this gave points for sentimentality going in. The rules are written in the same "programmed instruction" manner as SL. Read the basic rules and play scenario #1 (Brecourt Manor). Add a few more pages of rules on terrain and snipers and play scenario #2 (Pouppeville). Add rules on tanks and play scenario #3 (Tank Attack at La Fiere). And so on...

Last night's exercise was to play Brecourt Manor so that I could get the basics down. The scenario (for which I had built a custom terrain board of trenches and gun emplacements...just because...) is the historical event that was the main battle scene in episode 2 of Band of Brothers ("Day of Days"). Elements of Easy company paratroopers attack a fortified German artillery battery that was shelling the American troops on Utah Beach on D-Day. The picture shows the German set up with the guns in their emplacements, firing on the beaches to the north (right of photo). The paratroops enter from the west (top of photo) and need to silence the guns as quickly as possible.

I won't go into detail on the two games of this we played, but as the Americans I failed both times to capture the guns quickly enough to prevent the Germans from accumulating enough victory points to claim a win. But the important thing is that I feel like I have a decent grasp of the basic rules and have begun to see some of the nuances of this particular rules system.

In general, I have a very favorable impression of the rules and am anxious to play again, getting further into the rules as we go (at the top of the photo you can see the edge of the scenario 2 battlefield which is set up and waiting). The basic game mechanics are similar to Squad Leader in the sense that a unit which fails one morale check breaks. A broken unit that fails a morale check dies. Events can cause multiple morale checks, therefore killing a unit if more than one morale failure is rolled. The card driven random activation keeps things interesting from a sequencing perspective, and will make the scenarios play differently based on the luck of the draw. The basic mechanics are simple enough, but there are plenty of decisions to be made as units and individual elements activate, keeping the suspense level high. The one aspect of the game that we were not able to take advantage of is that the game is ideally suited to having a referee. There are spotting and hidden unit considerations that are impossible to do optimally with two players and no ref. That being said, some basic common sense and good sportsmanship get around those limitations fairly easily. For our next game, we will be using hidden unit markers and dummies to attempt to add some of the fog of war back into the game in the absence of a referee. I'm sure it will work fine.

It's nice to be playing WW2 again...

Monday, July 15, 2013

Book Review - Bloody Buna

A few weeks ago I saw something that caught my interest in a big way. It was the announcement that the Flames of War folks would be releasing Pacific War rules and a supporting line of figures, beginning with Japanese infantry in late July. From what I have seen, FoW doesn't interest me in the slightest, but the figures they put out are very good, and when they do a range they tend to be ridiculously extensive about it. That announcement gave me visions of all the little Japanese tanks and tankettes, Australians in slouch hats, CBI Brits... More on that later.

The other thing the announcement did was make me want to pull out a Pacific theater book of some sort to really get the imagination ramped up. My choice was one of my favorites from my high school days (and a friend Leo favorite as well), but a book I had not read since; Bloody Buna (1974) by Lida Mayo. A few years ago I searched out a copy on eBay for old times' sake, and am very glad I did. Mayo was a historian in the Army's Military History division, and she worked with the same group of people who wrote many of the Army's "green book" official history series.

This campaign, from July 1942 until January 1943, and running concurrently with the Guadalcanal campaign, covers the first campaign in Papua, New Guinea. It includes the Japanese invasion of Milne Bay and the drive towards Port Moresby, including the vicious fighting along the Kokoda Track and in the Owen Stanley Mountains. Subsequent to the Japanese withdrawal back towards the north coast, the fighting for Buna, Gona and Sanananda are covered in adequate detail. This isn't a shot by shot recap, but is an operational overview, covering the troops movements, attacks, successes and failures. It does a good job of placing the fighting here into the overall context of allied operations elsewhere, and paints a clear picture of the difficulties faced by both sides. The terrain here was rugged inhospitable jungle, and the allies were not at all prepared for this kind of fighting, either from a training, leadership or equipment standpoint. There is a very valid conclusion that the allies won here not so much because they were able to defeat the Japanese, but because they were able to out-survive them. Allied air and naval presence was literally able to bring the Japanese to the brink of starvation, to the point where evacuation was the only option. Very few got out, and the casualties to the allies were horrific (far worse than at Guadalcanal, which was bad enough). This was a campaign that taught the allies many lessons on how to fight the Japanese in their well-hidden coconut log bunkers, tree tops and mangrove swamps, but those lessons came at a very steep price.

I cannot recommend this book highly enough for a great introduction to a campaign that may not be as well known, but is fascinating in many regards.

Sunday, April 28, 2013

April Miniatures Status

It's time, I suppose, for an end-of-April status check of how I have done against my expectations for the  month. With only a couple days to go (and workdays at that), I think I have done fairly well.

Some of what I have been up to...
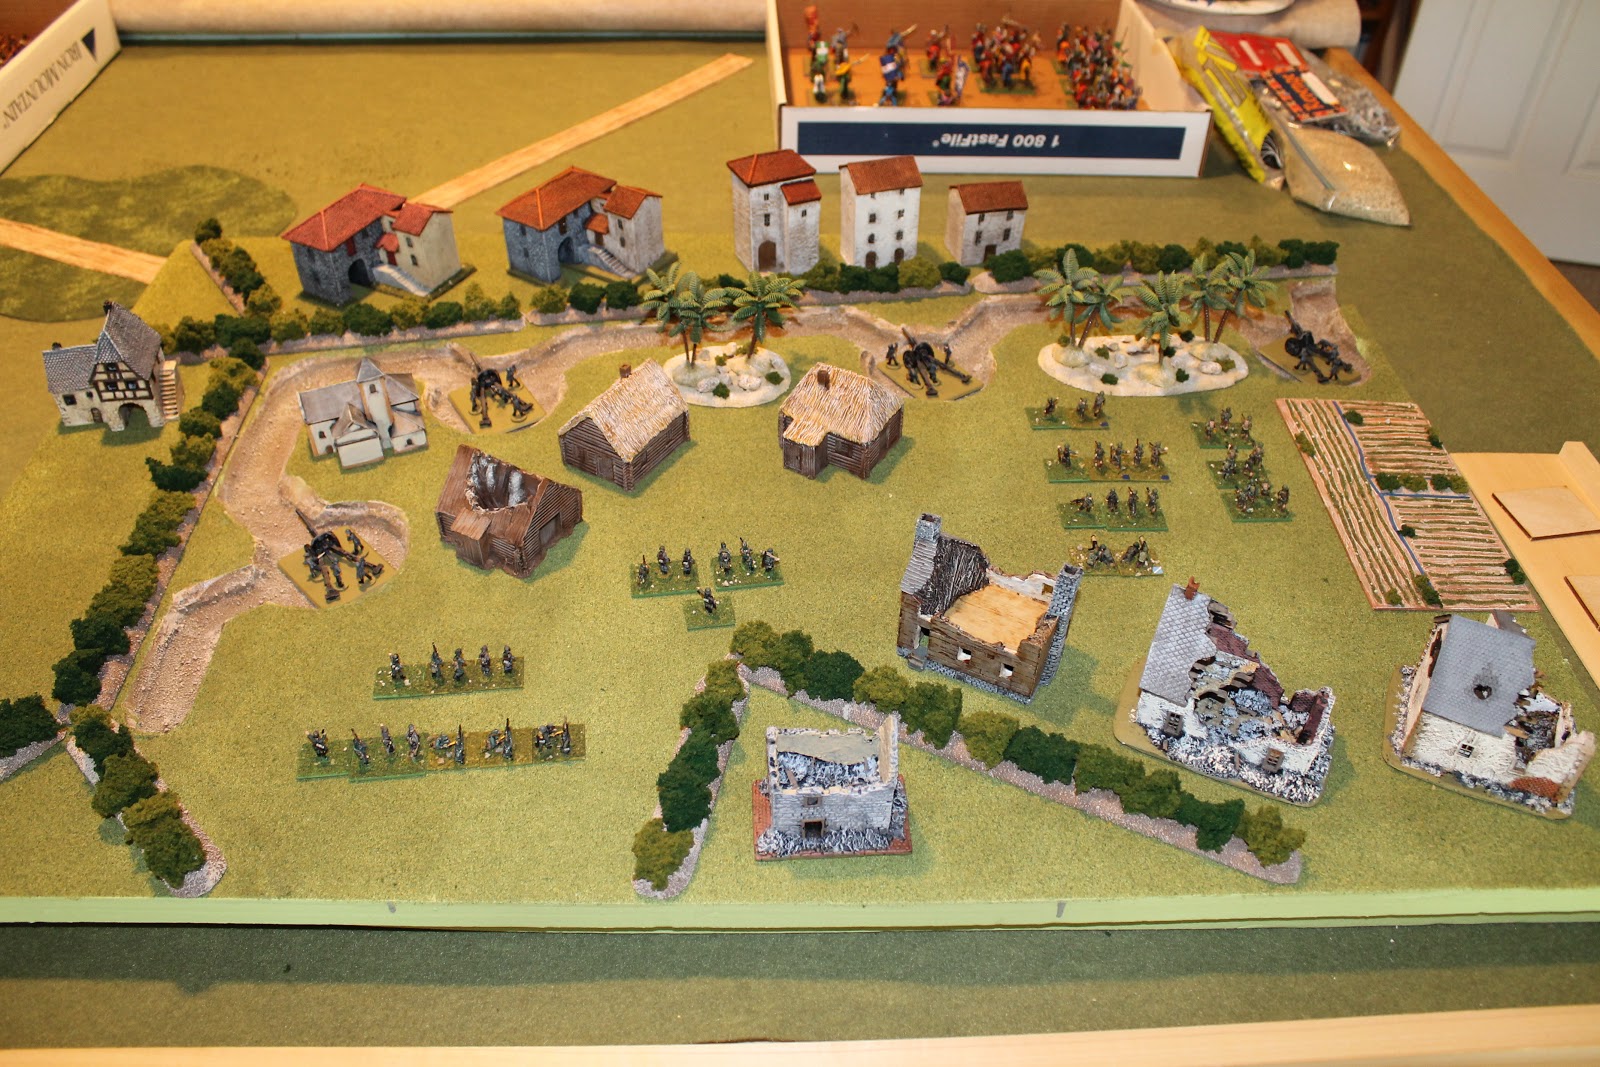
By way of a status update, I scattered a variety of the things I have been working on on top of a custom terrain board I have made. The terrain board itself is a 2 foot by 3 foot representation of the "Brecourt Manor" scenario (the first scenario) in the Fireball Forward rule book. In the gun emplacements are 4 stands of 15mm WW2 German field artillery, with crew. The 15mm figure stands elsewhere are the troops required for this scenario, as well as the added stands necessary for the second scenario in the book. Hedgerows are pieces from the terrain project described here earlier. Leo and I have been talking about getting together to play some Fireball Forward, and what better way to get the proverbial juices flowing than to have the terrain and troops all ready to go. Leo, if you are out there reading this, I am ready when you are...

Toward the back of the picture are two test pieces I have made of "palm tree" terrain for my Crusades project. They look pretty decent, I just need to make about a dozen more. The pieces are simple balsa wood bases, sanded and painted, with palm trees glued down along with an assortment of Woodland Scenics brand talus (model railroad rocks) and foliage clusters. On the right side is one piece of "farm field" terrain that was a test piece for playing around with artists' modeling compound. I'm not sure what period this kind of thing would be useful for, so I am still tinkering with this.

Along the back edge are five 15mm Italian buildings from the old Architectural Heritage (AH) range, now sold under the JR Miniatures brand (although I understand JR has gone under, and these will be sold elsewhere...). I use these for both Italy and Spain in the Napoleonic era.

In the middle center are three thatch roof and wooden buildings that will serve for 15mm WW2 Eastern Front.

On the left side, back, is one Architectural Heritage building in the 15mm "Prussia" range that can serve for any period from post-medieval through WW2. To the right of that building is a 5mm AH version of the church from the famous Napoleonic battle of Aspern-Essling in 1809. It is a beautiful little model, and goes with the huge amounts of 5mm (tiny) Napoleonics that I have but never ever use...

Lastly, there are four ruined buildings of various types for use in 15mm WW2 games. The front-left one is an old AH casting, but I am not sure who made the other three. The right-most two are by the same manufacturer, and are beautiful multi-part models.

Pictures of my Crusades project re-basing progress will be posted separately, but all things considered, I will end April roughly where I had hoped to be. Re-basing efforts are moving along. I have finished a few projects in the terrain making area, and I have been able to knock out the painting of buildings in a number of eras that have been primed but languishing in the "partially done" box for quite some time. Hopefully I can continue this progress into May and June...