Sunday, June 5, 2016

Underdark Terrain...Circling Back

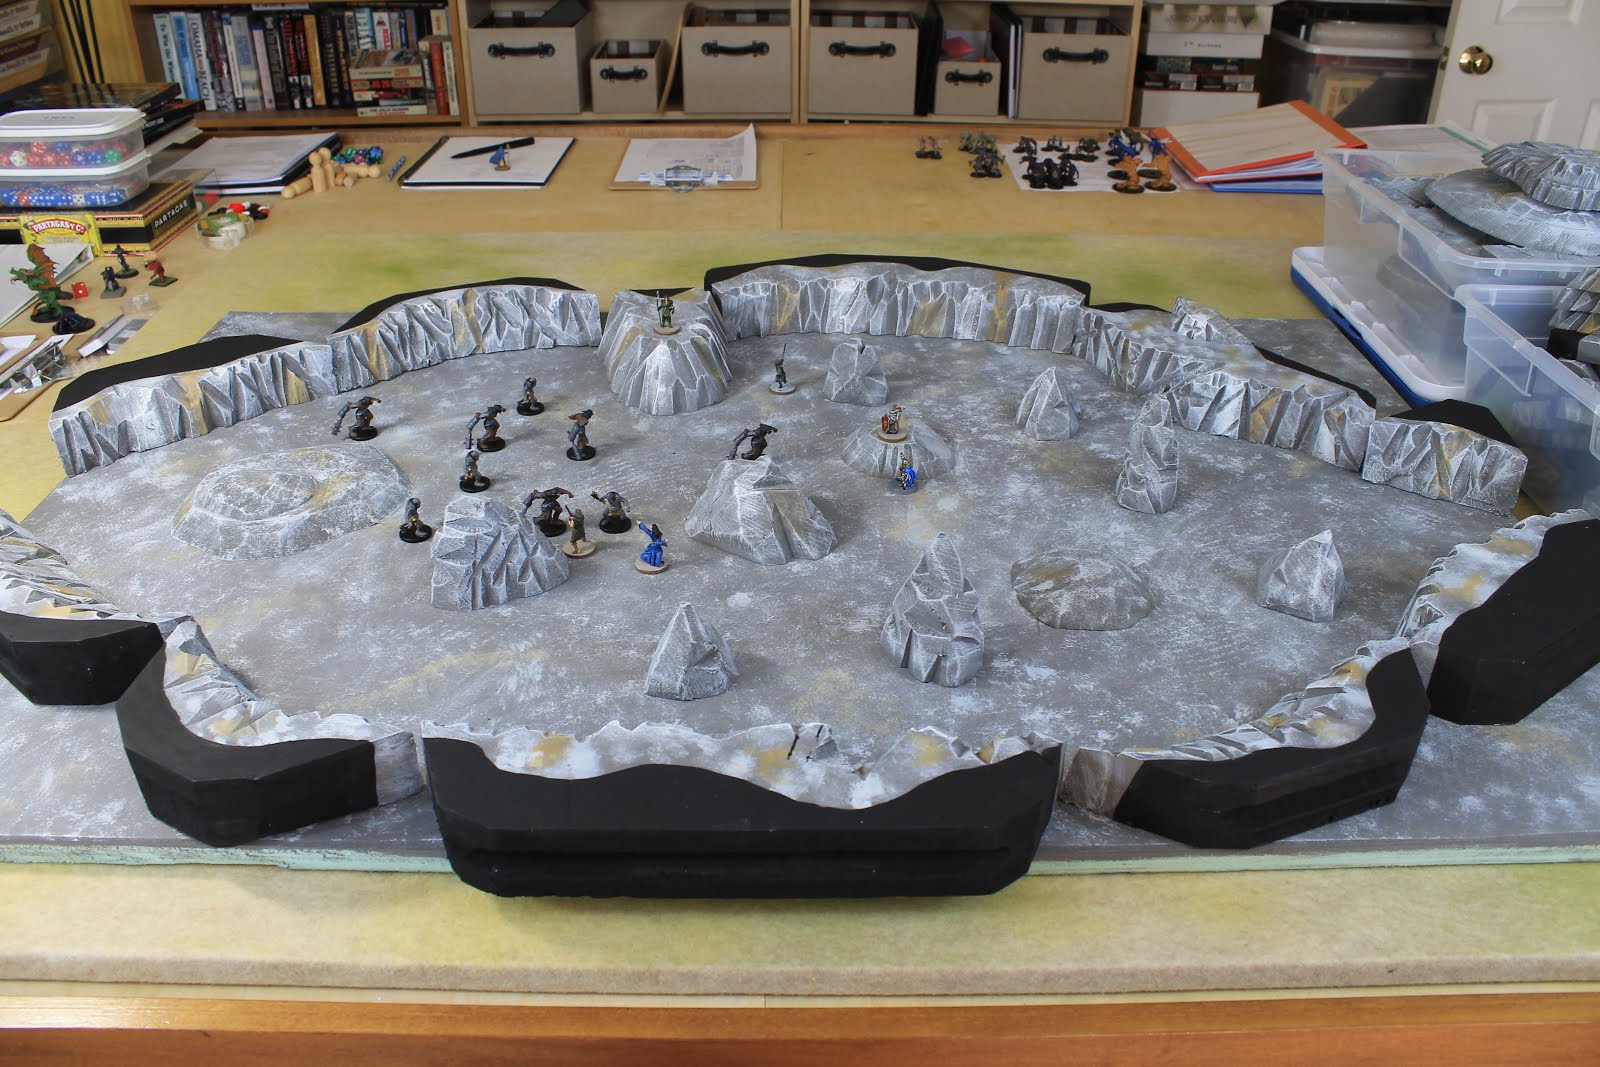
Way back in August of last year, I did a post on the beginnings of some Underdark terrain, with an eye towards replicating the type of terrain seen in the Bridge of Khazad-Dum scene of the Lord of the Rings movies. At least in terms of epic scale and sense of height.

I never showed any pictures of the end result, but I can rectify that now.
Finished Product - Massive scale bridge works

The pieces were finished (probably within days of the August post) and were used in one of our first Underdark game sessions (they were too cool not to...). Our group came down the high stairs and saw a troop of goblins moving parallel to them, but on another level well below them, and oblivious to the presence of the party.
Side view

There was ensuing arrow fire and the raining of much fiery (spell) death upon the goblins, who quite literally never knew what hit them.
A few of our characters on the causeway

The terrain pieces were actually quite simple to carve and paint, but this was one of the first "ooh and ah" moments we had in our game from a miniatures perspective, in terms of feedback from the players, and thus in a sense is partly responsible for all that came after. As is typical of human nature and the desire to replicate an ego/adrenaline boost, "that was awesome" quickly turns into "ok, how can I invoke that response again?"

And so is born the basement full of extruded polystyrene insulation board. But more on that soon. Probably in a few minutes actually...


Saturday, June 4, 2016

Fantasy Maps

Back in a January post, I wrote about a couple of cool books that Brother Dave gave me for Christmas, one of which was on drawing fantasy maps. I showed a poor quality, badly lit picture or two of a map in process (something from our D&D campaign). I never showed the finished product(s).

The first is a map of a portion of the world; the portion that our campaign has taken place in thus far (a small portion of this map, actually). This is not a fine piece of art by any means, but was nice to be able to give to our players and say "this is your map of the world." It has enough of an old-ish style feel to it to seem like something that a band of adventurers could have in hand.
Our campaign area - larger scale (~400 x 300 miles)

The second is a smaller scale map of the immediate area that has been the base of operations for our group during pretty much all of the campaign to date. Again, simple but hopefully evocative.
The Shearingvale (~30 x 25 miles)

Lastly, here is a picture of a map of the largest city within easy traveling distance of the Shearingvale, Turil, about 50 miles west of Linden. The city center (the walled section) is a photocopy of the first version of the city that I sketched out while half watching a Flyer's hockey game on TV. Realizing that this area wouldn't be large enough to be a city of 5-6,000 people, I added the other two sheets of map on which the citadel has been placed (probably during another hockey game or two). These are simple black ink line drawings with some colored pencil shading on streets, marketplaces, corrals and stockyards. Even less of an attempt at "art" was made here, but the overall effect is pretty cool, I think. In a geeky sort of way...
The Free City of Turil

I must say that there are limits to my insanity, so no, I don't have a key that details each of these hundreds of buildings. But yes, I do have a simple key that names 4 or 5 locations in each of the 8 or 9 areas of the city. No detail to speak of, but some inns, taverns, and special locations. The players have been to the city once, interacted with maybe a half dozen of the locations, and the simple storyline prep for these was adequate.

I have always had a fascination with maps of any and all kinds, and I find it therapeutic to sketch out things like this. Whether we ever have use of them in a game is almost irrelevant. Almost.

Friday, June 3, 2016

Junior Prom

While I'm catching up on stuff I should have blogged about, I did mention proms, right?

Julia attended her junior prom on April 22, in a group with a bunch of her friends from the Drama Club.
All of my girls and Julia's best friend and guardian angel

One senior friend, Emily, came over just to do her hair and makeup.
Julia and her senior buddies

Another senior friend, Carly, drove her and went with her.
Some of the Drama Club gang

Of all places, her junior prom was at Springfield Country Club, in the town where I grew up. Go figure...
And again...

She had an absolute blast, and I will be forever grateful to the seniors who took the time to participate in her special day, and make it one that she will always remember.

Time goes by much too fast.

Skater Girl

It's been too long. Anyway...

Things have been busy, which is great, and I have done a lot of writing. Unfortunately from a blog perspective, most of my writing has either been related to our D&D campaign or some fiction I have been dabbling with, and nothing to speak of here in a dog's age. I hope to rectify that, as I do enjoy the blog, and have neglected it over the past bunch of months.

More on D&D, crafting, prom season, end of school concerts, etc, to follow. The topic of the day is skateboards. Specifically, a new board from the Girl Skateboard Company. Several of the older girls in the neighborhood have been into skateboarding for a while now, and Grace has been trying to keep up on a hand-me-down junker of a starter board and a penny board picked up recently.
New Board - Bottom

However, when you make distinguished honor roll for your first year in middle school, good things happen (at least from dads who like to spoil their little girls). So I took Grace to Kinetic Skateboards in north Wilmington this afternoon "just to look". The guy there was extremely helpful in addressing what we were looking for: a standard board, outfitted for cruising and not trick riding. Because of Grace's small size and the intended use, he suggested softer wheels, moderately fast bearings and softer bushings. After listening to him explain everything, all that made sense.
Top (with clear grip tape)

So we came home and had dinner. After dinner, I suggested we go back and get her a board. I got no objections, so off we all went. An hour or so later, we had a brand new completely custom-built board, outfitted for just what Grace needs. She picked the board, the trucks, the wheels, the bearings (all based on recommendations) and they put everything together while we waited. She even got a proper helmet (in purple of course, to match her newly re-dyed purple hair).

Fortunately, there was some daylight left when we got home, and she was able to try out the board.
It works!


She pronounced it "perfect". And that's a good day.

Friday, April 8, 2016

Spring Goldfinches

I'm not sure why this year and no other years that I can remember, but as it has warmed up this spring, I suddenly have swarms of goldfinches perching on my home office windows, and pecking at the glass. Odd. But nice.
Goldfinch friends

They are numerous, persistent, and don't scare off easily.
Close up...

At one point a couple days ago I had 5 at one time. Very odd indeed...

Thursday, April 7, 2016

Double Rainbow

Twice in the last couple of weeks following evening rain showers, we have had beautiful double rainbows in almost exactly the same spot. Here is today's. There was a brief moment when it was a triple, but I don't think I caught it at the right moment despite many pictures. There may still be a hint of a third at top, or that may be wishful thinking.
Double Rainbow behind the house

Saturday, April 2, 2016

Spring Geocaching

It's spring, the trees are budding, things are greening up, and that means it is time for me to have my annual burst of geocaching energy. Between some finds in New Jersey, Delaware and Pennsylvania in the last couple of weeks, I have reached 1172 finds, and have now filled in 295 dates on the 366 date calendar. Sure, most of this was accomplished in 2010-2011, but hey, I'm making progress. Slowly.

More often than not, I get a few caches these days when either further from home, or when one or both of my girls are willing to go out and get a few with me. Julia is sitting at 225, and Grace is now at about 220 (give or take a few).
LittleCacherG up in a tree

The things that makes me want to grab a few caches more than anything is the desire to get out in the woods for a walk now that the weather has warmed up. My favorite kind of caches are the ones that will force me to get my lazy butt out onto a trail (however modest) and put a little effort into finding them. Or at least a short walk anyway...

Goals for 2016...modest. Get past 1200, maybe even 1250. Cross another 15-20 dates off the calendar. Clear out the newer ones that have cropped up near home. Have fun doing it. In other words, simple but achievable goals.

Saturday, March 26, 2016

Easter Weekend

The kids had the week off, and I'd accumulated a lot of vacation time already, so we took the Thursday and Friday off and headed up to visit the in laws in northern New Jersey. We just got back almost exactly three days later, and we crammed a lot of good stuff in those three days.

Geocaching - The main thing for Thursday was for Amp, Julia and I to go into New York City, have dinner, and see a show on Broadway. But that left a few hours in the morning before we needed to go, and there are still a lot of geocaches not far from their house that need getting. So Grace, Ines and I went out and walked for about a mile and a half in the woods, picking up three caches along the way, including one really nice one in a tree. It was a good thing we had Grace along for that one. It was an easily climbable tree, and Grace enjoyed it, except for a minor touch of apprehension when she looked down from the top for the first time...
Little monkey in a tree

Saks Fifth Avenue Windows - Costumes from Outlander. Having left home at around 2 and gotten into the city by 3, we had time to kill before taking Julia to Ellen's Stardust Diner for dinner. We knew one thing that we were going to do - check out the temporary window displays at Saks Fifth Avenue, which had about a dozen costumes from Amp's favorite show - Outlander. Between her love of the show (and books) and her experience over the last few years doing costume design for the high school musical productions, this was something she really wanted to see. While not 100% my cup of tea, I have to admit that the costumes were pretty cool.
Outlander costumes


St Patrick's Cathedral - right across the street from Saks is St Patrick's Cathedral. I'm not catholic in particular, or religious in general, but I do appreciate art and architecture, and churches, especially the big opulent ones, have magnificent detail in abundance. St Patrick's did not disappoint in that regard, as you could probably spend days if not weeks studying the ridiculous amount of detail in that massive space.
St Patrick's Cathedral


Heading from Saks and St Patrick's toward Broadway, we passed through Rockefeller Center, which was nicely decorated for the Easter season. We stopped to watch ice skaters on the rink for a little while.
Easter in Rockefeller Center


We got to the Stardust Diner at around 4pm, and there was a line halfway down the block. We got in line to wait, as this was an experience we wanted Julia to have. This is the place where the waitstaff all sing throughout your stay. I've been there once and Amp has been there a couple of times, and we knew Julia would love it. A 65 minute wait later, we were seated, and it did end up being worth it. Julia was enthralled. At one point, one of the guys was singing a song, and made extended eye contact with Julia, pointing at her as he sang. Afterwards, Julia said "I think he likes me...but I'm way out of his league". Amp and I almost fell out of our chairs we were laughing so hard.

The real highlight of the day (and trip) was Something Rotten at the St James Theater. We had great seats 5 rows back in the center of the mezzanine, very close to the stage. The St James is an ~1,100 seat theater, medium-smallish by Broadway standards, but was comfortable. The show itself, about the creation of the world's first musical (in Shakespeare's time, and in competition with Shakespeare), was absolutely hilarious, and well worth the hefty price of admission. Heartily recommended.
Something Rotten at the St James Theater


The last major part of the trip was a private horseback riding "party" for Julia, Grace, Isa and Ines. Isabel and Ines do horseback riding at a local farm, and they also specialize in therapeutic riding for handicapped kids. We had 5 or 6 people, 3 ponies and a horse, and an hour in the indoor riding ring for the girls to enjoy. To say they loved it would be an understatement.
Grace on Junie


Julia was a little apprehensive at first, but became comfortable enough pretty quickly, and had a wonderful time. This will probably be something that we try to arrange again in the future when we are up there. Grace is also asking about riding at some of the local farms near us in the Brandywine valley.
Julia on Vanessa


Even with some time to relax around the house, and sleeping in some, it still seems like we had a pretty full three days. Which we did. Now we are back home, and tomorrow, we have Easter dinner with Dave and his gang, along with Mom and Chris, which is something else to look forward to.

Wednesday, March 23, 2016

Gingerbread House

Grace loves to bake, to craft and to make stuff. She doesn't necessarily like to eat the things she bakes, but that's a different question.

Recently we picked up a book of fancy gingerbread house ideas, and Grace and Amp worked on one over the last couple of days.
Fancy Gingerbread House

The result, I think, is pretty remarkable. Amp helped with the basic construction, but Grace did most of the rest. I especially like the fondant work on the miniature baked goods. As a modeler and crafter of my own hobby stuff, the detail work here does my heart proud. Creating is fun, and I am glad that Grace thinks so too.

Thursday, February 11, 2016

Wisdom Teeth

OK, so I just had to post this picture, future wrath of the daughter notwithstanding. Julia needed to have a couple of wisdom teeth out. Having had a couple of my own out as a teenager, I knew this wasn't something that Julia could get through awake, so we needed to go with the full sleep option.
The Recovering Patient

Everything went fine, but it was quite a cute and comical thing coming out of the anesthesia. She had ice packs draped over her head like saddlebags, gauze sticking out of her mouth, and had, for lack of a better word...temporary insanity. When she first woke up she had no idea who she was, who we were, where she was, or pretty much anything else. She came about fairly quickly, was on the way home within an hour or so, and by the next morning the alien possession was gone and we had our daughter back.

Friday, February 5, 2016

Runestones

Last weekend, after getting back from a week-long national sales meeting at the Gaylord Opryland Hotel complex in Nashville, I was able to finish the runestone project begun a week or so earlier. To recap, the runestones were carved from foam insulation board, painted a medium gray color, runes were scribed with a dull pencil point, and then colored in with a fine point black Sharpie.
In process

The next step was to dry brush the pieces with a light gray color (Folk Art craft paint in Dove Gray).
First light gray dry brush coat

The last step was to pick out a few bits of detail with a medium brown color and a tan color. The final pieces shouldn't be too monotone, and the bits of brown and tan coloring break up the all gray color scheme.
Runestones

The pieces, when complete, are simple but effective. They can be used as Underdark pieces (which they will be...(spoiler)...or as outdoor pieces.
Runestones (again)

All in all, this was a nice simple project that took perhaps an hour and a half in total, and resulted in ten pieces of scatter terrain that can have multiple uses. Total cost, with the materials already in hand, was basically nothing. Allocated cost of the actual materials used would be less than $10. Not bad for a handful of multi-use pieces.

Christmas Tidbits

Brother Dave always does a good job of paying attention to whatever my interests-du-jour are, and getting Christmas or birthday presents that tie into those interests. This Christmas was no different, and Dave and his Darling Wife got me (among other things) a couple of books that I have devoured.

The first was the Kobold Guide to Worldbuilding, a brief paperback (121 pages) containing a variety of essays from a bunch of different people with a lot of collective experience in the fantasy role playing game and related industries. I liked this book a lot, and my only complaint, if any, was that it wasn't long enough. There were chapters on design methodology and a variety of different aspects of fantasy world creation. While none of these essays was extensive in length or scope, they were all filled with good advice on things to consider, approaches to take, and the like. Given my...ok, let's call it an obsession...with creating the world we are playing D&D in, this little book gets a solid "A-".
World building, and Fantasy Maps

The second of the two books was How to Draw Fantasy Art and RPG Maps, by Jared Blando. As we have gotten back into playing D&D after all these years, one of the things it has gotten me interested in doing is to get back into sketching and drawing. I have bought a few books on basics of drawing and sketching, and this is a good complement to those, focusing specifically on fantasy map cartography.
Sketching a piece of our World (in progress), 11 by 14 inches

In a couple of spare hours over the course of the past few evenings, I have made a beginning effort at turning a piece of the players' world into a basic (beginner) hand drawn map. The picture above is what I have so far. More to come as this progresses. Sketching in some forested areas comes next, which will be time consuming. So we'll see how that goes.

In the meantime, thanks to Brother Dave and his family for giving me a few Christmas gifts that do indeed keep on giving.

Saturday, January 23, 2016

Cavern Pillars

Interesting what two feet of snow will do. I've now posted more blog entries today than I did in the last 4 months of 2015 combined. Hmmm...

Anyway...one of the things I have noted in our first few sessions of using my new Underdark terrain set is that there are a few kinds of pieces that were not in my initial build that would be very useful to have. A few of those, begun over the last week or so, and completed today are:

90 degree pieces of 2 inch tall cavern wall for forming passage entries into larger caverns. I had been using simple gaps in the walls, and while these new pieces are not really necessary, they look nice and work well.
Cavern passage entries (at left)

A few more pieces of rocky scatter terrain which character models could climb up on.
Rocky scatter terrain

A few pieces of floor-to-ceiling 2 inch terrain. This would serve to break up larger caverns, and represent areas where the rock goes from floor to ceiling. In my terrain pieces, this is represented by the black painted centers. Our rule is that if there is enough gray for a miniature to stand on, then a character can climb to that spot (and claim the high ground, for whatever purpose). If there isn't enough gray painted area for a miniature, then it represents sheer wall. The picture below shows two new "floor to ceiling" pieces for breaking up larger spaces.
Cavern with entry, scatter and floor-to-ceiling pieces

I also took a few pictures today as I made the new floor-to-ceiling pieces. The process detailed below is consistent with every piece of terrain-making in my Underdark collection (as well as most of my dungeon terrain as well...).

Step 1 - Carve the basic shape out of the appropriate sized foam, in this case 2 inch soft blue insulation board. The blue board is softer than the pink, which is grainier and stiffer. I just had some blue scraps, so I used them. When in doubt, use what you already have (and have paid for...). It took me maybe one minute each to carve these pieces.
Step 1 - Carve simple shapes with a knife

Step 2 - Base coat the pieces with your gray base color. I use Behr "Iron Mountain" as my base (from Home Depot). A quart of interior flat is maybe $12 (US). It took perhaps 2 minutes each to base coat these pieces.
Step 2 - Paint gray

Step 3 - Dry brush with a lighter gray (in this case, I use Folk Art brand craft paint from Michael's, specifically "dove gray"). On terrain pieces this size, I use a large semi-stiff artist's brush (shown). Pay particular attention to dry brushing "top to bottom" so that you make a point to catch the top edges of the pieces, as these will be the most visible to the viewer. Once the base coat was dry, it took about 30 seconds to dry brush each piece.
Step 3 - Light gray dry brush

Step 4 - Add a couple spots of tan and/or white dry brush to break up the monotony of all gray. And another 30 seconds for this step.
Step 4 - A little tan and white

Step 5 - Add black paint to mark out of play areas. As noted above, in our games, if there isn't enough gray area to fit a miniature on, the area is unplayable, and represents vertical walls. In the case of these two pieces, no miniature can fit anywhere on the top surfaces... And a minute each for these. In all, paint drying time is longer than the time spent in doing the different steps.
Step 5 - Add "theater black" to mark out of play areas


The finished product - the picture below shows the two new pieces, along with the 90 degree passage entry pieces and the new scatter terrain, making a large cavern with some interesting features. A large open area is never as interesting for an encounter area as one with a variety of features that the characters can interact with.
Finished product

So that's pretty much how I have made all of the stuff in the last few posts. Easy. Readily available. Cheap. All good things. A sheet of nominal 1 inch thick foam insulation board (4 foot by 8 foot by 3/4 inch thick) is about $15. A 2 foot by 8 foot sheet of 2 inch thick foam is about $18. A quart of paint, which can coat dozens of pieces, is about $12. Craft paints for highlighting are maybe $1.69 each. Add a couple of paint brushes and a knife, and you have all you need. Other than a place to store this big pile of foam...

I'm not aiming for fine art, which this is clearly not. And I am not aiming to make diorama quality detailed pieces. I want to make simple but effective pieces that enhance our gameplay, and these certainly seem to do that.

Runestones and Pools

A post on a couple of the small projects I have in the works.

First, some old and crumbling rune-carved pillars. These could be found above ground or below, and I do not have any specific plan in mind for them. Pillars are carved from foam and painted gray. A dull pencil is then used to etch runes lightly into the surface. The recessed etchings are then "painted" with a black Sharpie. After the rest of the basing is done, (piles of rubble, glued and then painted) a final dry brush highlight of light gray will be applied. I applied the highlight to the top surface of the one piece lying down just to see the final effect. All the rocks, whether on the rune pieces or the little pieces of scatter terrain by themselves, will be painted black, and then successively dry brushed with shades of gray.
Rune carved pillars - in process

For more complex areas of smaller caverns and passages, I have another set of modular pieces. These can be laid out as the adventurers explore. Making these kind of cave warrens in the way detailed in the prior post would be difficult. I would call this method a "positive space" way of doing it. Passages and caverns shown are hollow spots in the ground, everything else is solid. This is the same method I used for my linear dungeon pieces (squares, rectangles and regular hallways). [Which started all this, and which I will show sometime soon]
Caverns and passages - "Positive" Space


I saw a YouTube crafter's video recently about making recessed pool areas in foam pieces using nail polish (Black Magic Craft I believe it was). The chemicals in the nail polish melt the foam a little bit, before the melting stops. Judicious use of the polish gives you a controlled melt, which can then be painted and filled in (blues for water, oranges for lava pools, green for slime, brown for mud, etc).
Testing the nail polish melt method

To add cavern pieces of interest, I am going to make some that have pools of various kinds. The first such piece is shown below. Nail polish has melted three areas, which have subsequently been painted black. The rest of the painting will be done later. They will be water pools on this piece. After the painting is done, a bit of clear two part resin epoxy (like Envirotex) will be used to fill the pools.
Cavern piece with pool areas

And a close up of the larger of the melted pool areas. This is a nice technique that will have lots of uses in a fantasy world terrain set.
Nail polish melted pools

I will post pictures of the finished pieces, but that will likely be next weekend at the earliest.

In the meantime, I may be able to get some photos up of the dungeon terrain.

Dungeons and Dragons - Underdark Encounters

As I noted earlier, we have had a 5th edition Dungeons and Dragons game going since October of 2014. We play sporadically, every other week when we can manage it, but sometimes 3-5 weeks between sessions. We have seven total players, and typically have between 4 and 6 at any given session. Plus me. It's kind of odd, but in the entire time we have been playing, we have never had all 7 players at a game at the same time. We planned to a few times, but something always happens for somebody. This actually works out fairly well, as running a group of seven 4th and 5th level characters would be quite large, and a typical group of 5 is almost ideal purely from a game-management and encounter building perspective.

Anyway, the point of this post was just to show some pictures, as promised earlier, of the new modular Underdark terrain we have been using. The new terrain (and related binge miniatures purchasing) has really added a terrific dimension to the game.

For Underdark encounters in passages or caverns, I have a "stone" painted sheet of foam insulation board approximately 3 feet by 4 feet. This serves as the generic base for whatever needs to go on top of it. There are other custom pieces, but this is our starting point.

Passage walls, when needed, are typically laid out from a collection of 1-inch thick modular pieces of foam (cut from the remainder of the base sheet). These have been bevelled on one side (45 degrees or a little steeper), carved up (simply) on the bevelled edge to give texture, and then painted. The same colors are used on the modular walls as are on the base board. A medium-darkish gray flat interior latex house paint (Behr "Iron Mountain" in this case) is the base coat, over which "dove gray" craft paint is sponged and dry brushed. Small bits get a white or tan dry brush just to break up the monotony. The solid rock areas are given a coat of "theater black" paint to denote them as "off stage."

The scene below was a night's rest in an alcove off a passage, interrupted by a giant spider.
Resting for the Night, with a Giant Spider

For larger caverns, I have made an assortment of modular pieces from 2-inch thick insulation board, using the exact same process as for the thinner pieces.
2 inch foam cavern and passage walls

The larger pieces, laid out over the same baseboard, provided the scene for an encounter in a large cavern. In addition to the walls and floors, a number of foam chunks have been spread around as scatter terrain, marking rises in the floor of the cavern as well as serving as stalagmites and other rocky protrusions jutting up from the floor.
Large Cavern Encounter

The combat between our party and some bugbears and grimlock slaves is shown below.
Combat Closeup - Bugbears and Grimlocks

It doesn't take much effort (or skill) to make these pieces, just time and a few basic and cheap materials. They serve to make a multitude of different configurations, and the basic pieces, in conjunction with a few special pieces, can make a huge difference in the visual appeal of the game.

I'll show some of those special pieces and some current works in progress soon.

Blizzard of 2016 - Winter Storm Jonas

Stuck in the house with 12-18 inches of snow down and a little more to come between now and midnight, so I might as well see if I remember how to do a blog post. It is blowing hard and the snow is still coming down, so I have no real idea of how much we do have. Depending on where you look on the deck and in the yard, we have a couple of feet or nothing. Whatever the truth is, it's a lot, and with more to come over the next 12 hours.
18 inches or nothing? Hard to tell...

Everyone is safe and warm, and we have power (and internet), so all is good with the world. Tomorrow (Sunday) will be the day to dig out, or more accurately, pay someone else to dig out. In the meantime, there is nothing to do but lounge around, do some hobby stuff and spend time with the family, and wonder if the business trip I am supposed to fly out for on Monday morning will happen. I guess I should say, the trip will happen at some point early this week, but will it be Monday morning or some time after?...
Garage roof glacier

The kids are bummed that we had this big storm on a Saturday. I can understand that.

Oh, and I guess sometime before dark I should go out into the side yard and get that piece of my chimney siding I see laying out there and stick it in the garage before it blows away entirely...