Tuesday, December 31, 2013

Year in Review 2013

This won't be a terribly long winded review of the year, but I guess I'd better post something so I can move ahead into the new year with subsequent posts in proper chronological order. Random selection of pictures included...
Grace's 1st sleepover (the body-less head)

The main thing, and the only thing that matters really, is that everyone is healthy and doing well. My family is the joy of my life, and I continue to be amazed at how fast the girls are growing up. I have gone from years of "wow, they are growing fast" to "no no no way too fast, stop the bus!". They are turning into quite interesting little people, and I couldn't be more proud of them.
Something funny on Julia's 15th birthday

Julia continues to be involved in Special Olympics and the Spirit cheerleading squad, while Grace does gymnastics, piano and clarinet (both instruments new this year in terms of actual lessons). I can't believe Julia is in high school, but she must be because she has a minor role (bystander #2) in the high school's spring 2014 production of Les Miserables. She is on cloud 9, and I think that Bystander #2 is the most important small role ever in a musical production. Grace's piano teacher continues to gush over what a natural talent she has and how quickly she is picking things up. Which makes me wonder what she could accomplish if we could get her to practice...
Julia, my (big) little angel

Highlights of the year from a family event perspective would have had to be seeing Les Miserables in Philly early in the year with Julia, The Lion King on Broadway with all four of us, and the Avalon vacation in August.
Grace school picture day

Musically, it was a pretty good year. Amp and I saw three shows together: The Eagles in Philly, and Justin Hayward and Graham Nash (both in Wilmington). We also got to see Brother Dave play with the Rosewood Trio a couple of times which was a real treat as well. I am thrilled for him (and jealous of course). As for playing...short of finding some dedicated time and a commitment to practicing, I will continue to be relegated to owning several nice guitars that I can hack around on a little. For the time being I can live with that. I like having them in the house.
Brother Dave with the Rosewood Trio

Outdoor activities were unfortunately very few and far between. I did a couple of brief solo day hikes and I think that was it, outside of the guys trip to Maine in September. Someday maybe I'll go back and blog about that if for no other reason than to post a bunch of beautiful pictures from the couple of days that I was there.
Acadia NP, Maine
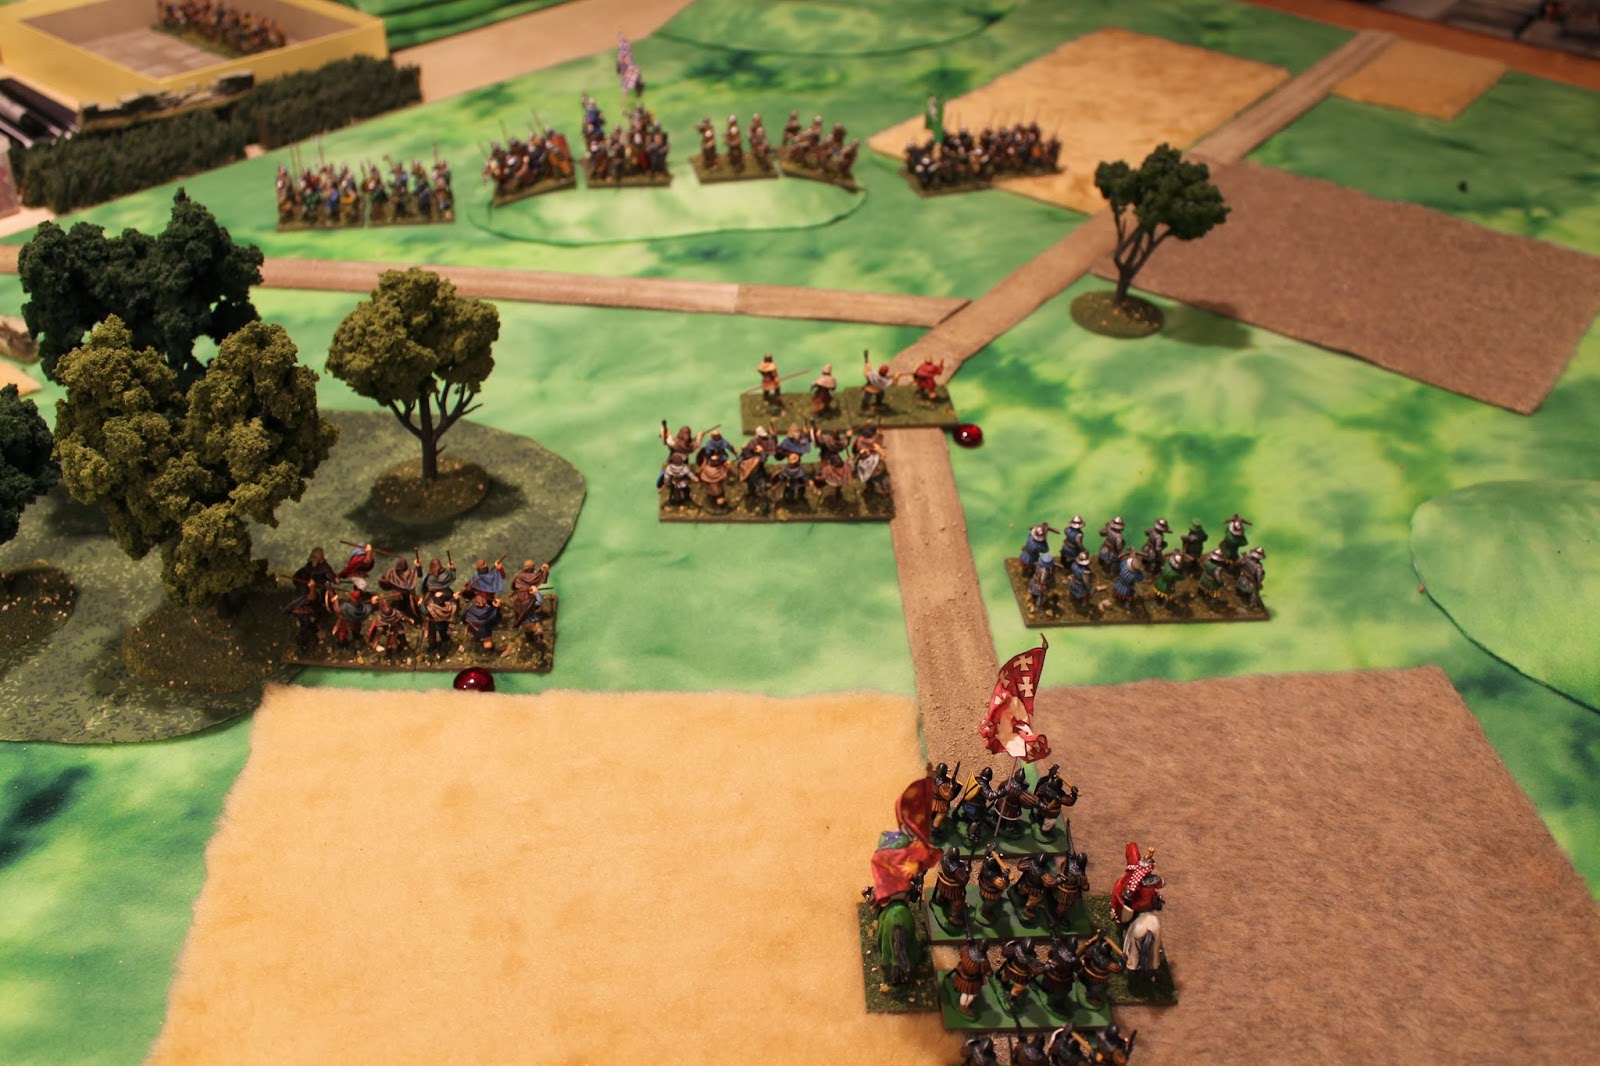
From a hobby perspective, I accomplished what I set out to; I followed whatever whim struck me at the moment. The end result of which is that I got a lot done and had fun in the process. I painted more buildings and made more terrain pieces than actual painting of figures, but I got a decent amount of that done as well, and without specific painting goals, everything I was able to get done was fine in and of itself. I made progress on re-basing my Crusades stuff for Impetus, I completed a good basic set of modular terrain tiles and some fleece covered multi-purpose boards. I completely reorganized and cleaned up the gaming area in the basement with Amparo's help. I did a lot of maintenance on older figures (re-basing where needed, touching up paint jobs and brightening colors). Some Ottomans got painted, and a lot more got prepped and primed for when the mood next strikes me. I learned how to play Impetus, and had some great starter games of Fireball Forward! with Leo. I also made the decision to purge myself of some unused figures/periods and actually did it. I do hope the actual playing of games picks up in 2014, but all things considered 2013 was a good hobby year.

I enjoyed taking pictures with my good camera, and slowly but surely I am learning about all those fancy things it can do beyond point and click.
Pretty dawn sky

I read a lot as usual, but not much fiction this year.

We also spent a lot of time cooking in the beautiful kitchen that Amp created for us back in 2011. It was a large and expensive project, but as much as we love to cook and hang out in the kitchen with friends and family, I think it was the best house investment we have ever made. Especially over the holidays, we tried a ton of new recipes, which I will be writing up as time allows.
Kitchen fun

Lastly, as we get ready to move into 2014, I am thinking about the Christmas tree stand project that Amp and I built together. It was a lot of fun, it looks good, and it has given us the confidence to start thinking about other things we can make. There are a million home Do It Yourself blogs out there with great plans and ideas, and I know that Amp already has her eye on a number of projects.
My sous chef

And so that, in a brief recap, was my/our year. Perhaps not as brief as I thought it would be.

My final thought relates to something that I think Brother Dave wrote about once. "Be Present". Which I interpret to mean being engaged and attentive to what you are involved in; living in the moment, I guess you could say. Time seems to be moving faster and faster every year. The kids are growing up at warp speed. Middle age is on the horizon, not over it (no! it's not here quite yet, thank you!). And so today...I shall make the most of the day.

Farewell 2013.

Christmas 2013

We had a very relaxing and laid back holiday around the Eric's Days of Battle house. We had my sister-in-law and her family here from the Sunday before Christmas until the day after, which was nice and gave my kids a chance to play with their cousins. We cooked a lot, ate too much, drank some good wine, and just generally tried to do nothing much of substance. We succeeded admirably.

On Christmas Eve, I got to hand the reins in the kitchen to my brother in law, who made a delicious (and very involved) Portugese Fisherman's Stew. One can always eat around the squid tentacles...
Amparo and bro-in-law dirtying all the pots and pans

While we prepared a late dinner, the kids anxiously awaited the arrival of gifts. I mean Santa.
Killing pre-Santa time playing Uno

Dinner was excellent, and the best part was that I got to watch instead of cook. Sometimes it's nice to just watch.
Christmas Eve table

I'll post the full recipe and more pictures of Christmas Eve dinner on my cooking blog at some point, but the stew was an amazing concoction of squid, chorizo sausage, scallops, clams, cod and shrimp. Plus lots of other stuff.
Portugese Fisherman's Stew

Christmas morning began remarkably late, with the kids not dragging us out of bed until nearly 8am. Yay, kids! The highlight of the kids' Christmas was the overly generous gifts from Santa of a pair of Kindle HDX's, the side benefit of which is that with each kid now having a tablet of their own, Amparo gets her iPad back. Since she got the iPad as a gift a couple of years ago I'm not sure she has seen it much (it's been welded to Julia most of that time). So she sort of got a nice gift too, in addition to her actual gifts.
Thing 2 shreds wrappings

As for yours truly, Santa did come this year in spite of that whole naughty/nice list thing, and I got a couple of books (a Giada cookbook I didn't already have and a Napoleonic history book on the French 9th Legere regiment...geek time), a couple of CDs (new Mark Knopfler and new Tedeschi Trucks Band), as well the previously mentioned photography lighting kit. I have been having lot of fun with the lighting kit, which allows me to take much better pictures, at least of the miniatures themselves in the sense of what amounts to "product photography". The initial results of that playing around can be seen in the Miniatures Gallery page linked off my main page at the upper right.
Impromptu photo studio

Christmas day itself was very nice, with the obligatory big hunk of beef dinner in the form of a standing rib roast. The only down side was that we didn't get to see Brother Dave and his family and my Mom and Chris on Christmas day, but would catch up with them in the coming days.

The rest of the days of Christmas week, before and after the big day itself, was a blur of...not too much. But I mean that in a good way. I got to relax around the house with Amparo and the kids and extended family and friends, watching some TV and movies, playing games, painting a few miniatures buildings, cooking a lot and trying new recipes (which I love), and just generally basking in the glow of having kids young enough that Christmas is still a really special time of year. And that is the best Christmas I could ask for...

Monday, December 30, 2013

Medieval Miniatures Gallery

I have had some time to play around with my camera and my new lighting kit today, and took a bunch of pictures of some of my medieval miniatures. Pop on over to the "Miniatures Gallery - Medievals" Page at right if you have any interest....

I will add more pictures (and more periods) and post notes here to that affect as I do.

Sunday, December 29, 2013

Deathknell Watch

Front-ish view
The other thing I have been working on painting in brief spurts over the holidays has been the Games Workshop fantasy building "Deathknell Watch". This is a nice little tower building, and unlike just about everything else by Games Workshop these days, is reasonably priced and a good value. But that's a rant for a different day (when I am feeling a lot angrier...).

I assembled this kit sometime earlier this year, primed it black, and then stuck it in a box while I moved on to other things. But like with the WW2 buildings posted about yesterday, I wanted to make some progress on something during the holidays in spare moments, and buildings are easy.

I painted this in a total of perhaps two hours, but it is hard to tell exactly since it was done in a bunch of 15 or 20 minute sessions scattered over a period of a week or so. It is painted in the same color scheme as the one on the box cover, with tan stone mixed with some more orange-ish pieces. Other stone trim work is in light gray. Like the WW2 buildings, this was again mainly an exercise in dry brushing with a large flat brush (multiple layers of color, dark to light), then some washes, then some final lighter dry brushing for highlights and to tie everything together. Simple.

As to whether I will ever use this for anything remains to be seen, but it does fit in with my Empire and Vampire Counts odds and ends (for which I complete maybe one or two units per year).
Stairs and catwalk to upper story door

If nothing else, it was fun to work on and is one less unpainted thing lying around the house. And I could always sell it on eBay. Nah.

Saturday, December 28, 2013

Painting Table Saturday - Dec 28 - Buildings

I saw an entry on a blog that I started following recently (here) that seemed interesting, so I decided to join in. The idea is "painting table Saturday", and the thought, done periodically it seems, is to have as many hobby bloggers as possible post what is sitting on their painting table in progress at the moment.
W.I.P. #1 - An abnormally clean workspace...

I just put my painting table back together following the recent departure of holiday house guests with little ones who require that my painting table gets stashed away during their visits, so it is much less cluttered with random bits than usual. All that is on it at the moment is the current project that I have been working on in tiny sessions at the kitchen table with a bottle of paint or two during holiday down time. The project is a trio of ruined buildings (Old Glory, 15mm scale) for use in WW2 games. These are very nice and inexpensive pieces that paint up very easily. They are basically just an exercise in layered dry brushing with a minimum of detail work. There is no intention that these be slaved over like works of art, but a competently done job will make them look terrific on the table.
WIP #2 - The Project

Sunday 12/29 addendum - After taking the above pictures early in the day, I had some extra time in and around a pair of family visits to my Mom's and my Brother Dave's to complete the three buildings. I am very happy with how they turned out, and will mix in very well with the WW2 buildings I already have.
Complete #1

All that is left to do, other than one last inspection to make sure I didn't miss finishing any spots, is to give them a few good coats of matte varnish for protection.
Complete #2

Lastly, one thing that I seem to apologize for a lot in my posts over the years is for the poorly lit pictures and subsequent bad picture quality. Following the arrival of a new Christmas toy set (more on this separately), I don't think I should have to apologize as much anymore. The above two pictures of the finished buildings were taken on the corner of my table with the setup shown below: a photography lighting kit with stands, reflector umbrellas and daylight bulbs.
New lighting toys

It should be fun playing around with these, and will help make my camera act more like the really good camera that it is...

Friday, December 20, 2013

Book Review - The Tank Killers

Earlier today I finished yet another history book that I have been working my way through over the past few weeks (ok... months): Harry Yeide's The Tank Killers; A History of America's World War II Tank Destroyer Force (Casemate, 2004).

Sideways again.... sigh...
I think I first cracked this book open sometime shortly after the Fireball Forward! miniatures games with Leo earlier this year, and a subsequent trip to Baldwin's Book Barn in West Chester that turned up a number of good deals on WW2 books.

I enjoyed this book very much. The opening section details the formative years of tank destroyer doctrine in the US Army and the training phases prior to actual combat experience. The bulk of the book works its way chronologically through the various campaigns in Africa and the European Theater of Operations. In addition to being a wargamer's treasure trove of small unit action scenario ideas, the descriptions of the combat experiences at a micro level are woven into a story of the evolution of tank destroyer doctrine at the macro level, and how the role of tank destroyers as envisioned differed so dramatically from the actual role that the TD units ended up playing.

There were also a number of things that I learned from this book in the area of equipment used and dates of service. I had always been under the impression that the self-propelled TDs in service for the bulk of the war in Europe were M10 "Wolverines" with their 3 inch (76mm) guns. This is somewhat true, but this book shows that M18 "Hellcats" (very fast, lightly armored TDs with 76mm guns) and M36 "Jacksons" (basically M10s but with 90mm guns) were in widespread use much earlier than I had thought. The first M18s were delivered in Italy in April 1944 and the M36s began replacing M10s in northwestern Europe in September 1944. By the Battle of the Bulge and subsequent operations, a mix of M10s, M18s and M36s would have been commonplace. This greatly expands the possibilities for the miniatures gamer...

There are two other Harry Yeide books that I picked up at Baldwin's at the same time as this, and I am especially glad that I did. These are Steel Victory; The Heroic Story of America's Independent Tank Battalions in the War in Europe (Presidio Press, 2003) and The Infantry's Armor; The US Army's Separate Tank Battalions in World War II (Stackpole, 2010). If they are similar at all to The Tank Killers, I will like them very much. Steel Victory is already on the night stand.

Wednesday, December 18, 2013

Book Review - Nothing Gold Can Stay

First off, I will unabashedly admit to being a huge fan of Ron Rash. He is one of my very favorite modern writers. So I will always pick up whatever new book he publishes as soon as I see that there is a new one to get. His most recent is a collection of stories titled Nothing Gold Can Stay (Ecco, 2013).

Rash's novel Serena is one of my all time favorite novels, and I have written about him several times in the past in other book reviews. As I have read more and more of his work (as he publishes more...) I have become increasingly unsettled by his short stories, in the sense that he often writes dark, tragic stuff. As I have noted before, the writing is lyrical, atmospheric and emotionally very raw...these are good things. But they tend not to be hopeful stories. And while I do think that the tragic side of things can make for some of the truest and most "real" writing, it can also be exhausting to read story after story that leaves you with a sense of "ugh".

Nothing Gold Can Stay continues this trend. Like Burning Bright (2010) and Chemistry and Other Stories (2007) before it, it is a work of masterful writing but one which left me drained. Despite all the things that life throws at us, and that which we bring upon ourselves, I am a fundamentally optimistic and hopeful person. I'm not sure Ron Rash is. But that being said, these are some fantastic stories, and well worth reading. And a few are even hopeful...

Despite the dark side, the publishing of a new Ron Rash book is a minor holiday for me, and this is no exception. This is brilliant work that everyone should read.

From the opening paragraph of The Woman at the Pond:
"Water has its own archaeology, not a layering but a leveling, and thus it is truer to our sense of the past, because what is memory but near and far events spread and smoothed beneath the present's surface."

Tuesday, December 17, 2013

Book Review - Victory at Poitiers

The second history book I finished recently was Victory at Poitiers; The Black Prince and the Medieval Art of War, by Christian Teutsch (Pen and Sword, 2010). This is another in the Campaign Chronicles series, and much like the Shrewsbury book, the title is misleading in the sense that the book covers much broader subject matter than just Poitiers itself.

This is another relatively brief book, at 141 pages. It starts with a simple overview of France and England at the start of the Hundred Years War, covers the first invasion and the battle of Crecy in 1346, and the period between Crecy and Poitiers, including events in England and the battle of Neville's Cross. This all takes up the first 65 pages.

Sorry...tilt your head
The next 64 pages or so detail the campaign leading up to Poitiers and the battle itself, with the final 12 pages covering the aftermath. A very interesting and thought provoking section for the wargamer is the detailed discussion on identifying the exact location of the battlefield itself. As is the case with many medieval battles, the general site of the battle is known, but the exact location in terms of troop deployments and lines of battle, as well as the progression of events across the terrain, is not. This can be especially debatable in areas where low lying swampy areas have been drained, woodlots cut back (or expanded), etc... Teutsch presents a compelling case for where he thinks troops were deployed and how the battle progressed topographically. I am inclined to think his interpretation makes a lot of sense and if wargaming Poitiers (which I have the armies for), I would use his version to recreate the battlefield on the tabletop.

I was very satisfied with this volume in the series overall, and would be inclined to pick up other titles in the same series that would be of interest to me, as I have now read two of them by different authors and both were quite good. Recommended.

Sunday, December 15, 2013

Book Review - War For the Throne

I have finished a number of medieval history books over the past few weeks. The first of the three was War For the Throne; The Battle of Shrewsbury 1403, by John Barratt (Pen and Sword, 2010). The subtitle is a little misleading, as it seems to be for the Campaign Chronicles series in general.

As the series title would indicate, the book is about more than the battle of Shrewsbury itself, and indeed about way more than even the campaign culminating in the battle. It is really a short history of the entire period in which this campaign and battle is a part. It begins with a brief overview of the reign of Richard II, continues into Henry Bolingbroke's coup of 1399, and his subsequent murder of Richard II and ascension to the throne as Henry IV. In a brief book of only 128 pages, this "Background" section goes all the way through page 56, or almost half the book.

The campaign itself, and Henry "Hotspur" Percy's rebellion, is set in the context of events in Wales and the Scottish marches, which are described in detail. Prince Henry (later Henry V) has his exploits covered as well. Lots of Henrys...There is more about Owain Glyn Dwr's Welsh rebellion than anything else. Shrewsbury itself takes a mere 12 pages, but given the lack of details on most medieval battles, this is to be expected.

Overall, this was a quick and informative read on a period that I did not know a whole lot about. As my  first reading of a book in this series, I expected a more narrow focus on the events of the title, but in retrospect I am glad that the book covered what it did. In the future I will have a better idea what to expect. If you are looking for a book on this battle and campaign in a narrower focus, you are likely to be disappointed. If you are content with a brief but effective overview of an 8-10 year period, then you will find this book worthwhile, as did I.

Tuesday, December 10, 2013

It's Beginning to Look Too Much Like Christmas

Beautiful view out my office window (at home)
I like snow. But enough is enough for the moment. We had a nice snow on Sunday, far exceeding the forecast. We were supposed to get a few inches and ended up getting about 8-9 inches. This was great for the kids, who got to go out and play with their friends all day and have a good time. We didn't have to go anywhere, so we didn't get caught up in all the road nightmares that they were talking about on the news (and which some friends got tangled up in). The bonus was the two hour school delay they got yesterday morning because of the hazardous road conditions. Main roads didn't seem too awful on Monday morning, but side roads were very treacherous and there were a lot of fender benders, including a car which went off the road and hit a tree right down the street from us.

Last night they were forecasting more snow today, ranging from a dusting to a foot depending on who you listened to. Consensus seemed to be in the 4-6 inch range. Another two hour delay seemed certain, with a day off a distinct possibility, since the storm was supposed to start during the morning rush hour and continue through much of the daylight hours. Sure enough, we got a call from the school district at 5:25am that school was being cancelled for the day. The kids are thrilled.

It's very pretty. The kids are having a blast. But we have a lot to do to get ready for Christmas. Errands to run. Shopping to finish. And they are already talking about the next storm we could get over the weekend.

Save some of this for Christmas!

Sunday, December 8, 2013

Christmas Tree Stand - DIY

I am addicted to surfing miniatures hobby blogs. I'll freely admit it. But as much as I troll the web looking for "gamer eye candy",  my wife does likewise but with home decor and home related do-it-yourself blogs. This is perfectly fine, of course, and occasionally spawns the "honey, we can make this, I know we can" conversation. Which is actually kind of fun. She has made a bunch of things on her own (sewing and craft projects), and we have made a few things together, like doll beds and picture frames. I generally get involved when carpentry and power tools come into play...

Recently, she saw a planter box plan for a deck planter that she really liked, and thought that the same basic plan could make a good Christmas tree stand. I thought so too. After a bunch of sketching and measuring and plotting and planning, we settled on a plan and bought the materials we needed. On Saturday we made the tree stand. It sort of followed a basic plan seen elsewhere, but was modified enough that I feel like it is something we came up with together, which is nice.

Materials List (roughly): (all wood was clear select pine, for eventual staining)
  • Two pieces 21" 1x6 boards (2 sides of inner frame)
  • Two pieces 19.5" 1x6 boards (other 2 sides of inner frame)
  • Twenty-four 15" pieces 1x4 boards (6 per side for 4 sides)
  • Four 15" pieces 2x2 boards (corner posts)
  • Approximately 16 linear feet of 1x2 board (top and bottom framing of each side)
  • Approximately 16 linear feet of 1x3 board (top and bottom trim of each side)
Tools:
  • Cordless drill with bit for #6 screws and phillips driver bit
  • Dewalt 10" compound miter saw
  • Air compressor with nail gun using 2" finish nails
  • 1.25" wood screws (#6)
  • Wood glue
  • Fine sandpaper
The General Plan: The container would be built around an interior box (like shown in picture #1) that would serve both as a frame to construct around, as well as a 6" tall platform to raise the tree up off the ground. Each exterior side would be made of six slats of 1x4 lumber (each 4" wide nominal board is actually 3.5" wide, so the total width of six slats is 21"). Corner posts would be 2x2 to give some architectural relief. Tops and bottoms of sides would be 1x2s laid flat, and final trim framing all the way at top and bottom of sides would be mitered 1x3s. Like the raised corner posts, the final trim work is both useful for providing more architectural relief as well as hiding nails and screws. Everything would be nailed or screwed and hidden as best we could so that no visible nail or screw heads would be seen when we were done. Eventually, we plan to stain the container, but because we need to get the tree up and decorating done, we will use it unstained this year and stain it after the holidays.

Picture #1 - Lumber material and the old 24" square platform we have used the last several years. The old platform was dismantled and cut down to reuse the 1x6 boards and the plywood. Basically, we just turned the 24" square box into a 21" square box.
#1 - Materials (guitars optional)

Picture #2 - Basic components cut. 24 side slats and 4 corner posts are shown laid out around the interior platform pieces (along with one mitered piece of 1x2 framing). I was very careful to cut the 28 different 15" long pieces as exactly as possible.
#2 - Sides cut and laid out

Picture #3 - One side assembled and in place. The slats and corner posts are nailed in place down through the top and up through the bottom mitered 1x2 framing pieces. The bottom has had its mitered 1x3 trim board added to the very bottom (also nailed up through the bottom). The only visible nails at this point are those nailed down through the top of the upper 1x2, but these will be hidden when the final 1x3 trim is added. The completed side panel is screwed to the interior box by screwing through the 1x6 and into the assembled side panel from the inside using 1.25" #6 screws, which are too short to poke out the front. This first side is the front of the piece.
#3 - One side complete

Picture #4 - After having one complete side solidly in place, we simply built our way from front to back, doing the same thing we had done to the front panel, but rather than building one full side then attaching it, we worked out way down the sides one board at a time to make sure all boards were snugly together and we were not leaving any gaps as we went. We figured that any issues we couldn't easily fix or hide would end up on the back side of the piece which will be both hidden by the tree and facing the corner of the room, so nobody would ever see them. In the picture, you can see the ledge formed by the interior upright 1x6 platform framing. Since I was too lazy to cut the 24" square plywood piece down by hand (it won't fit in the miter saw and I don't own a table saw...yet...), I cut a few lengths of scrap lumber to 21" lengths and dropped them in to make the platform.
#4 - All sides complete

Picture #5 - All that remained after the four sides were complete was to add the final band of mitered 1x3 trim around the top to match the mitered 1x3 base at the bottom. We added this top trim without any visible nails or screws by screwing up into the bottom of the 1x3 trim (which is also wood glued) by coming up through the visible part of the top framing 1x2. You can only see the screw heads if you flip the whole piece over.
#5 - Top trim work complete. Done.

The Finished Product, with tree:
#6 - Stand (unstained yet) with tree 

All that remains is to stain the piece a medium brown color; something that will go OK with the family room furniture. This will happen after the holidays.

This was a fun project, which took us maybe 3 hours to complete. We could have gone quicker, but we were being very deliberate with our cuts and our nailing, and stopped a few times along the way to mull over the best next steps in our sequencing. We knew what we wanted to accomplish in general, but figuring out how to hide all the nails and screws was a bit of a puzzle at times. But an enjoyable puzzle.

As my wife noted when we were finished..."see, we can build anything..."

December Snow

It's beginning to look a lot like Christmas. Eight inches of snow on a lovely Sunday, decorating for the holidays, cooking, and watching the Eagles play a hilarious game in the snow.
Winter Wonderland

Decorated tree with our new tree stand (there will be a whole post on that...).
Skinny tree with new stand

Friday, December 6, 2013

Home Sweet Home

Yesterday was a bittersweet day. After 46 years of ownership, Mom made settlement and sold the house I grew up in. This was a very good thing in the sense that she has owned two houses since she moved into a retirement community almost a year ago. There was a lot of work to be done to get the house into sellable shape, and most of the burden for coordinating all that fell on brother Dave and his Darling Wife. So I know they were happy that this was done and over with. Extremely happy. Finally. And Mom was relieved as well to have one less thing to worry about.

But of course we are also sad that a very long chapter in our lives is now officially closed. I have not lived in that house for more than a few days or a week here or there since probably the summer of 1986, partway through college. But for all those intervening years it has still been the family homestead. Dad, Mom and Chris still lived there. And then just Mom and Chris. And then nobody lived there but the house was still there to be cleaned out and worked on. And now it's over.

On October 10, 1967, a couple with three very young boys bought the house, moved in, and had many long and happy years there. As of yesterday, another young couple with two young boys bought the house and moved in. It seems very fitting to me that the house should have boys in it again. I wish them luck, and hope that they have as wonderful a life in that house as we did. As long as they remember that the bedroom up the stairs to the left is mine...

Saturday, November 30, 2013

Modular Terrain Boards

As part of an effort to get rid of a bunch of things taking up space in the basement, I have been wanting to create a set of modular terrain boards. This would give me a lot of flexibility in setting up the table for games, as well as minimizing the storage space requirements to do so. After a few false starts over the last year or so, I have settled on a plan, and have made good progress towards accomplishing at least a solid phase 1. The end result, when complete, will be a series of one and two inch thick pieces that can be put together like a jigsaw puzzle in a variety of ways to create all sorts of different battlefields. A side benefit (but an important one) is that I have been able to dispose of several larger pieces, ranging in size from 2 by 4 feet to 4 by 6 feet.

#1 - Cutting jig (and hillside template)
For the basics I am starting with a relatively new Owens Corning product (at least to me) called "Foamboard for Projects" which is sold at the local big box home store in 2 foot square panels (1 inch thick). I was thrilled to see these in the store, since getting a four by eight foot sheet home is more of a pain, and harder to cut into smaller squares accurately. Since my gaming table is 6 by 8 feet, I decided not to use the 2 foot squares as is, since the tabletop is recessed about 3/4 of an inch down from a surrounding lip and a test fit didn't really work. I opted to make a jig out of strips of 1 by 2, which creates a 1.5 inch reveal. I use this jig to mark two cut lines on the panels and end up with a 22.5" square, since a 2" wide board is actually 1.5" wide. [See picture 1 for basic panel and my cutting jig]

To make the boards modular, anywhere hills go from board to board either on the center of an edge or on a corner need to be standard. To achieve this I have a few cardboard templates that I use to scribe the edge profiles on the sides of other pieces when building up hills. I have a "center side" template, a corner template, and a river cutout template (also to be centered on a panel). [Templates are shown in picture 2, and the use of one shown in picture 1]
#2 - Cutting templates and planning tiles

Panels can be anything you desire, simple or fancy, as long as they have standard joins on the sides to make them compatible with other boards. Strictly speaking, this isn't even true, as some of the boards in the collection can be non-modular but therefore only usable in certain ways. Standard size building blocks can also be combined into larger pieces (for example, 22.5" by 45", or 22.5" by 67.5"), although as you make larger pieces you create the storage issue I was trying to minimize. In addition to the standard pieces I have made thus far I am working on a "2 block" high hill and a "3 block" river section, using layers of poured Envirotex as the water. Picture #3 shows a basic panel as bought and a finished panel with a simple hill using a center edge join.
#3 - 2' by 2' pink board and finished product

To date I have completed ten pieces, which can be seen in picture #4 stacked in the rack I built (with their end profiles showing to see how they join). Picture 2 also shows some little template pictures I made so that I can play around with table configurations in small scale rather than pulling out all the life sized pieces and moving them around. Each piece is numbered to its matching card. Once I decide on what I want my table to look like for a game, all I have to do is see which tiles I used and pull only what I need out of the rack.
#4 - Edge profiles, and numbered

I will take a picture soon using some of the tiles I have made.

Monday, November 25, 2013

A Storage Project

Built
I have been slowly working on a set of modular terrain tiles over the course of the past several months. In the interests of minimizing the amount of storage space needed compared to the pile of big terrain boards (4 by 6 feet) that have accumulated in the unfinished part of the basement, I figured that a nice set of modular tiles would give me a lot of flexibility and allow me to discard a bunch of big rarely used boards. The purging part has been completed, and the first 10 terrain tiles are complete (I'll do a separate post soon on those).

Something that became apparent to me as this stack of tiles was accumulating was that I needed a good storage solution for them, or they would end up jumbled in a pile much like the previous stack of stuff leaning against the wall. While watching a cooking show on the Food Network with Grace it occurred to me that what I needed was a customized version of a baker's rack. So this weekend, I built one.

My terrain tiles are 22.5 inches square, so the interior needed to be an opening of approximately 2 feet. To give some wiggle room, it is 26 inches wide and 24 inches deep. It is a simple frame made of pine boards, with pairs of "shelf" braces every vertical 12 inches or so. Due to the lightweight nature of the foam boards, the framing can be pretty basic, and you don't need true shelves, just slats front and back to rest the boards on. I offset the slats from the front and back so the tiles sit comfortably on them, and installed a vertical "stop" in the center of the back so that the tiles simply slide in on the shelves until they hit the riser in the back (so they don't keep right on going and fall out the other side). It is braced properly so it won't fall apart.
Loaded

The whole assembly is six feet tall and will hold somewhere in the neighborhood of 20-24 tiles, assuming that some will be thicker than others. I mounted the unit on small caster wheels so I can move it around as needed. The finished product can be seen with my tiles in it. Each shelf will hold 3-5 tiles. I have put scraps of green fleece between each tile to cut down on friction, so that the flocking doesn't rub off as easily.
Current state of the gaming area

The seemingly never ending quest to reorganize is finally starting to feel like the end, for the moment, is in sight. I have purged a lot of things, sold some on eBay, sold some at the convention last week, and have spent a lot of time making sure I am using the available space as effectively as I can. I'm sure I will never really be done, but for right now, my gaming area no longer looks like a tornado hit it. So that's a good thing.

Sunday, November 17, 2013

Fall In 2013

The Fall In convention was held at the Lancaster Host in Lancaster PA this weekend (11/15-11/17), and as usual I went for the day on both Friday and Saturday.

The convention seemed well attended (the weather was good; no snow this year). I did my usual, which is to say wander around and watch as many different things as I could without actually playing in anything. I ran into Leo a bunch of times, as well as lots of other gaming friends and acquaintances. I did leave early enough Friday afternoon to see the Garnet Valley playoff game against Abington (see separate post).

Purchases were modest (sort of...maybe not):
  • General de Brigade Napoleonic rules. Still in search of the perfect Nappy rules, and this seems to get played quite a bit in other peoples' blogs.
  • Impetus expansion magazine Extra Impetus #5. Most of the content in this issue is the feudal period.
  • Three 15mm scale ruined building pieces from Old Glory for use in WW2 gaming. These are nice pieces that will be a breeze to paint up.
  • Ten beautiful 25mm scale flags for my medievals from the Flag Dude. These were an assortment of Ottoman, Hundred Years War, and a few suitably generic looking Wars of the Roses pieces.
  • A bunch of pre-cut bases from Gale Force 9.
  • Two more Flames of War 15mm houses to go with the five I already have. As noted on the blog before, a decent sized table for 15mm WW2 gobbles up lots of terrain, and I don't have enough buildings for this period and scale.
  • A book at the flea market: Wellington Invades France; The Final Phase of the Peninsular War 1813-1814, by Ian Robertson. I have liked this denouement phase of the war ever since doing research for my Orthez game.
Primed ruined buildings and some flags
OK, so perhaps my purchases weren't all that modest, but I did more than make up for it. I had signed up for a flea market table on Saturday from 10am to 1pm, and took a bunch of things I had not used in years, and might likely never use again. Over the course of two hours I sold almost everything I brought and pocketed $640. Not bad for a couple hours work (by noon I was substantially out of things to sell). I sold my collection of fighting sail era ships, all of my French and Indian war Brits and native Americans, any Warhammer 40k science fiction stuff I had accumulated over the years, a little bit of Bolt Action stuff I had bought on a whim but changed my mind on (including the rules), and various old books and rules.

After finishing the flea market, I spent a few more hours wandering and watching various games and then headed home with my head full of inspiration for new projects and expansions to old projects.

It occurred to me after the fact that despite taking a point and shoot camera and having my phone as well, I didn't take a single picture. Oops. Next time...

Saturday, November 16, 2013

All Good Things Must End

Abington 26, Garnet Valley 21
Garnet Valley's football season ended last night in the second round of the division AAAA playoffs, losing 26-21 to Abington. The game was there for the taking, with the good guys leading 21-13 at halftime. Unfortunately, we couldn't put any points on the board in the second half, and despite leading for 47.5 out of 48 minutes of game time, we were behind at the only point that mattered - the end. With two and a half minutes to go, GV's defense was unable to hold Abington from marching down the field and scoring the go ahead touchdown on a moderately long pass into the far corner of the end zone with 25 seconds to go.

It was a good close game, and the girls were happy to stay for the whole thing. The team had a great season and gave us many Friday evenings of fun. I hope they are anywhere near this good again next year. One way or another, I am sure we will be there watching the band and cheering on the team. Thanks Jaguars!

Monday, November 11, 2013

Impetus Campaign - Beren Roadblock

Henry de Cheraute's detachment is on the road to Beren with a little pillaging in mind when they find the road ahead blocked by a small force of enemy infantry...

Turn 1 (Henry advances...)
Friendly - All units move ahead two moves, only the left flank light infantry under Larcevaux disorder as they enter the woods.
Enemy - All units are on opportunity. The crossbows elect to fire on Boncarre's skirmishers, rolling one damage that luckily only causes disorder (skirmishers are very fragile with a low VBU and thus a low critical number - one damage and one bad cohesion test and they can vanish in an instant).
End of Turn 1

Turn 2 (...and advances some more...)
Enemy - The crossbows fire again, missing. No other actions.
Friendly - Larcevaux's light infantry fail to rally and move ahead into the woods. Pominville's heavy infantry move twice along the road (but not on it) and disorder. Boncarre's skirmishers rally, move ahead once, fire their javelins at point blank range at the crossbows...and miss. Oops. Morenz's light infantry move up behind the skirmisher screen. Wilkinson's crossbows move forward once and shoot at the heavy infantry directly to their front and cause one damage, but this only disorders the target. Cadogan's little band of Scottish pike men move forward along the road then form up, ending in disorder.
End of Turn 2

Turn 3 (The enemy gets aggressive)
Friendly - Boncarre's javelinmen breathe a sigh of relief at the double move (two friendly turns in a row; lost initiative last turn, won it this turn) and shoot at the crossbows, disordering them. Wilkinson's crossbows hold their ground and shoot at the disordered heavy infantry, failing to hit them. Pominville and Cadogan both fail to rally and move once forward. Larcevaux's men in the trees rally and move once forward, clearing the edge of the woods. Thomas' mounted men at arms wheel toward the open flank and move forward, disordering.
Enemy - At the start of the enemy turn, I roll a d6. On a roll of 6, some number of enemy units will appear, but the roll fails. I step back and survey the field, noting that I have pushed Henry's lighter units forward in advance of the heavier troops, leaving them somewhat exposed. I decide to randomize the enemy reaction, and on a d6 scale of 1 being very cautious through 6 being very aggressive, roll a 6. Aggressive it is, then. I decide the most logical course of action would be to attack with the enemy right and center, and refuse the left flank unit against the advancing knights. The left flank heavy infantry moves once to the rear, disordering. The crossbows rally, shoot at the skirmishers at point blank range and miss again. On the enemy far right (left of the picture), a unit of levy heavy infantry charge forward into Larcevaux's light infantry, disordering themselves as they charge far enough to make contact. In the ensuing fight, no casualties are inflicted and the units will remain disordered and locked in melee. Next, the enemy commander urges his own unit of heavy spearmen forward, wheeling once and charging Morenz's light infantry behind their skirmisher screen. Boncarre's javelinmen, seeing the enemy heavy infantry charging in from off to their side, toss one last round of javelins ineffectively before dispersing and fleeing the field. [A review of the Evading rules when this situation arose showed that a skirmisher unit being charged by a unit that began entirely outside of its frontal projection does not permit an Evade move...live and learn]. The enemy unit continued its charge through the fleeing skirmishers and into Morenz's unit in good order. Both units cause damage but only manage to disorder each other; they also remain locked in melee.
End of Turn 3

Turn 4 (The enemy waver...)
Enemy - The enemy win the initiative, so now they get a "double move". Another reinforcement roll fails. The melee between the levies and Larcevaux's men goes another round, causing a loss on the levies and forcing them to retreat 3 inches. The enemy commander's men fighting against Morenz's light infantry are not as lucky. In a ferocious and bloody melee, 2 losses are inflicted on Morenz, but the enemy suffers 3 losses in return. Morenz suffers a minor leg wound, but the enemy commander is swarmed upon as his unit retreats and is killed. Amidst the carnage to their right, the crossbows fired on Thomas' knights and inflicted a loss.
Friendly - Larcevaux's men fail to rally but charge the retreating levies to their front. They cause one damage, and yet another "6" on the cohesion test has the levy unit rout. Morenz, apparently distracted by his wound, fails to rally and holds position. Wilkinson's crossbows target their counterparts and cause one damage. The cohesion test results in the third "6" in a row, and the enemy crossbows rout. Seeing the combat in front of them, Pominville's heavy infantry rally and move ahead, as do Cadogan's Scots. The knights fail to rally but wheel to face the remaining fresh infantry unit.
End of Turn 4

Turn 5 (...and then crumble)
Friendly - Morenz's light infantry fail to rally, but move to the rear, interpenetrating Pominville's fresh troops as they go. Pominville rallies off the resulting disorder and charges the remnants of the enemy commander's unit. In the ensuing combat, the enemy unit takes its final loss and routs from the field, effectively ending any organized resistance.
Enemy - There is nothing left for the enemy but for the survivors to flee the field of battle as best they can, as only one unit remains.
End of Turn 5 / Game

Game recap and a few more thoughts on Impetus
This was a short little game that ended very quickly once the forces became engaged. An untimely string of three "6's" in a row on enemy cohesion tests effectively vaporized the enemy battle line in a matter of moments. Without those bad die rolls, this could have been a very different game (or certainly a longer one!).

These little games continue to serve their purpose for me. I am becoming more and more comfortable with the core rules and can focus more on learning the implications of the various charts and rules and their effect on game play. I still haven't come across anything that I really dislike. There are a few things that I still need to get used to, and formulate an opinion on. One is the fact that a poor cohesion test die roll can make a lesser unit disappear instantaneously; one moment fresh and perfectly fine, the next moment gone. The other is the lack of any morale rules. Nothing effects a unit, despite whatever may be going on around it, until the whole command reaches its break point and picks up and disappears. I suppose this works fine for a fairly simplistic game.

One possible criticism I would have is a similar one that I would have with many other miniatures game rules, and that is the draconian adherence to unit facing with regards to movement and charging. In truly linear periods such as the Seven Years War or the Marlburian period, this makes sense. I would argue that in much of the medieval period, where "units" as we would consider them would be more along the lines of "a bunch of guys", things shouldn't need to be quite so rigid. We need structure in the rules, I understand that. But I find that the result of the "thou shalt move very rigidly and in geometric precision only" rules tend to result in tabletop occurrences that often defy common sense. Movement often devolves into a weird stylized version of chess. I do not like the commandments of "thou shalt not deviate from a straight forward move." Or "thou shalt not wheel while moving." Or "thou shall only be permitted to wheel if it is the very first thing you shall do during your move." Why? If movement is a function of time spent and ground covered, why can't I wheel during my move and not only at the beginning (or the end), or as an entirely separate movement action? This is why I find games like Armati to be an unplayable exercise in ridiculousness. Which isn't to say that Impetus movement rules are any worse than most, they just trigger a personal pet peeve of mine, that's all.

All that being said, there is an aspect of the movement rules for Impetus that I really do like, and that is the opportunity to have multiple moves, discipline tests permitting, and with the risk that pushing your men too hard will result in disorder, leaving them vulnerable to the enemy. This creates good decision making points in the game, and adds a lot of uncertainty. This is good stuff.

Campaign - Henry's easy defeat of the enemy force allows him to plunder Beren, pillaging the village and burning crops, mills and property. No substantial losses were inflicted on Henry's forces, although Morenz's light infantry took a couple losses, so I will put a note next to them (maybe next time they get a discipline penalty or something).

Next...I need a scenario #3...

Saturday, November 9, 2013

Go Jaguars!

Garnet Valley High School football
We have been having a lot of fun the last couple of years attending the Garnet Valley high school football games. We started going semi-regularly when Julia was in 7th and 8th grades because her friends were going and she wanted to be a part of things. Grace grudgingly went along, and wasn't all that interested, but then realized that some of her friends were going with their families too, and then it became OK. It helps that the team has been good (as has been the marching band).

Julia's Spirit squad w/GVHS Cheerleaders, 11/1/13
This year, Julia is in high school, and some of her friends are in the band, or are cheerleaders, and she wants to go all the time. I think we made every home game this year except one. In addition to bringing back good memories of my own, it has been a lot of fun this year. The team has been fantastic, going 9-0 and winning the Central League, and going 10-0 overall. We are the number one seed in the District playoffs. GV scored a total of 381 points and allowed only 102, making the average game score 38-10. Most of the games have been substantially over by half time, and some of them by the end of the 1st quarter. We typically see the first half and then stay to watch the marching bands' halftime shows, and then leave (the games generally being about 30-0 or 30-7 at this point). Also, once a year, Julia's Spirit squad of cheerleaders gets to stand on the sidelines with the high school cheerleaders for a half and participate; Julia always loves that.

November 8, 2013 - Garnet Valley 35, Council Rock North 21
Last night in the 40 degree chill, we hosted the #16 seed, Council Rock North. CR started with the ball and moved it on us pretty well (which is rare) but didn't score. It was 7-0 good guys by the end of the quarter, and 14-0 a couple minutes into the second quarter. Our offense was good early but then got sluggish. It was 21-0 in the 3rd quarter when we gave up a 97 yard TD drive keyed by a lot of 7-8 yard short passes and a bunch of uncharacteristically dumb penalties by our defense. We didn't score in response, and then gave up an 80 yard TD run to the opposing QB. Suddenly it was 21-14 and we were back on our heels near the end of the 3rd quarter. The group of us sitting together wondered how the team would respond to the adversity, not having been challenged much late in games all year. At this point I have to admit that the kids were freezing despite being bundled up, and wanted to go home, which we did. I hated leaving early this time as it was a very good game, and the outcome was still in doubt. The rest of the results came by text message from our friends who stayed. Early in the 4th, as we were leaving, we had gotten the ball back and were starting to drive. We scored soon after to make it 28-14, then again to go up 35-14 effectively putting the game away. With only a few minutes left in the game, CR scored once more to get to the final of 35-21, but the game was out of reach by that point. We ended up scoring around our usual number of points, but gave up way more than normal, and the game was closer later than had happened all year. Our first string offense (missing a key running back) struggled moving the ball consistently in the middle part of the game; they are generally a juggernaut (before getting pulled for the second half). But all's well that ends well, and it is the playoffs after all...

Next week, Garnet Valley vs Abington, details TBD.