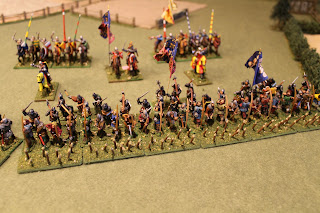
 In the first installment of this little how-to I described how I made the rough stands for my Hundred Years War archer stakes. This final post will have a few brief notes on finishing them along with the requisite pictures on the end product.
- The completed stands are sprayed with Army Painter Army Green spray paint (a medium green olive drab color).
- The stakes are painted with Citadel's Graveyard Earth (a medium brown).
- The tips of the stakes are painted with a craft paint, Folks Art's Camel (a tan color). This color looks a little too bright in the picture, but I originally used a duller tan color and while that looked good up close it disappeared into the background when placed on the table. This color makes the points "pop" nicely.
- Lastly, the bases are coated with watered down white glue and sprinkled with a mix of Woodland Scenics flocking and tiny stones.
 |
| An English force drawn up in a solid defensive position |
I think the final result is pretty effective at representing what I wanted. The only thing I would do differently looking at the end result is that I would probably be more careful to mix the "factory tip" pieces of stake with the hand carved ones. The factory tips on the toothpicks are perfectly round and tapered and look too well finished on close inspection. The whittled tips look much more like branches or small logs that have been hand-hewn. I tended to cut them in batches and make whole stands of factory tips on the first few stands. Oh well... Live and learn.
 |
| English longbowmen behind their stakes |
When all was said and done, this project cost less than $10 in materials, and generated 24 stands of stakes in less than 2 hours total time spent. It was also a nice little project in that I completed it in 15 to 20 minute increments over the course of several days. When I had a few minutes to spare, I could pop down to the work area, make a little progress, and stop easily before coming back to it later, after glue or paint had dried.
A well spent two hours if you ask me...
No comments:
Post a Comment